Scrapbooking Stickers

Santa Claus Stickers

Posted on November 18, 2010 by Jennifer Gormly

Tags: , , ,

Santa Claus Stickers

I love to challenge myself to find new and interesting ways of using scrapbooking stickers on my layouts and I find that my combining them with other elements, I can create a completely new and fresh look for my pages. For example, in this layout, I have used some Santa Claus stickers combined with a collage of tags and other scrapbooking elements to create a unique border down the left side of my page.

Click Here To View Our Full Range Of Christmas Stickers

It’s a fabulous way to dress up your Christmas layouts, but the design can also be easily adapted to suit any theme.

Santa Claus Stickers

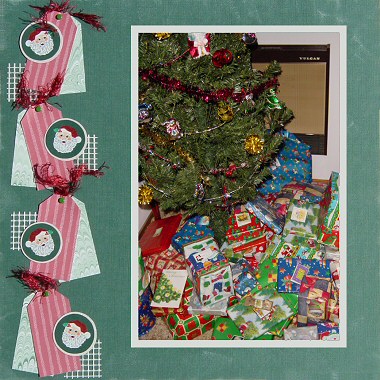
Materials Used: Dark green Bazzill cardstock, Patchwork Cranapple Red Stripe paper, Hot off the Press Green Marble paper, White Magic Mesh, dark green cardstock, silver cardstock, white ink pad, red fibre, green brads and Sandylion Shiny Santa stickers.

To recreate this scrapbooking idea, follow these steps:

1. Use the dark green Bazzill cardstock as your background. Ink the edges with white ink for added interest. When you are done, set it aside to dry while you work on the rest of your page.

2. Using a template or a punch, cut four equal sized tags from your Patchwork Cranapple Red Stripe paper. Do the same with your Hot off the Press Green Marble paper. Pair up each red tag to a green tag.

3. Cut out (or punch out) four circles from dark green cardstock and mat each one with silver cardstock for some Christmas shine.

4. Centre a Sandylion Shiny Santa sticker in the middle of each circle from the previous step.

5. Cut four squares approximately 3cm by 3cm of white Magic Mesh.

You now have all the elements you need to create your border.

6. Play around with the positioning of your tags and Magic Mesh along your border, keeping in mind the layout above. When you have decided on your placement, adhere your pieces of Magic Mesh first. Everything else will be layered on top.

7. Before adhering your tags in place, first attach a fibre to each set. Remember that each red tag should be positioned on top of a green tag. Attach your tags to your background using green brads.

8. Add your Santa Claus circles as a finishing touch.
 
You have now created a wonderful border down the side of your page just from a handful of sweet stickers and scraps of paper. Add your photos and any other embellishments you wish to finish the rest of your page.

Click Here To View Our Full Range Of Christmas Stickers

I’d love to hear what you think about this Santa Claus stickers scrapbooking idea. Please leave a comment in the comments box below.

Click Here For More Scrapbooking Ideas

Related Posts:

This entry was posted on Thursday, November 18th, 2010 at 8:58 pm and is filed under Christmas, Scrapbooking Stickers, Tag Art. You can follow any responses to this entry through the RSS 2.0 feed. You can leave a response, or trackback from your own site.

Comments

One Response to “Santa Claus Stickers”

  1. Charlene on December 11th, 2010 4:53 am

    I wanted to let u know u gave me a great idea for a page.. Instead of doing tags-I took ribbon inplace of tags.. Looks adorable,
    Thank U, Charlene

Leave a Reply


Card Making Ideas eBook
Subscribe for your free email newsletter full of great scrapbooking ideas and your FREE Birthday Card Making Ideas eBook.

Enter your details below:

First name:

E-mail:

 
More Info
Scrapbooking Sketches
Card Making Sketches
Quotes
Sketches
Book Of Me
Old Scrapbooking Ideas

The Basics
Beginners Guide
History
Colour Wheel
Glossary

Techniques
Quick Layouts
  Lots of Photos
  The Wharf
  Crabs
  Country Bears
  Asian
Altered Items
  Travel Box
  Paint Tins
  Frames
  Clipboard
  Magnet
Backgrounds
  Beauty
  Buzz
  Long Walk
  Christmas
  Our House
Borders
  Sequences
  Nature
  Leaves
  Christmas Borders
  Stamp Borders
  Colour Blocking
  Kitty
  Rainforest
  Sir William Mog
  Playful
  Daisy
  Swimming
Card Making
  Easter
  Floral Cards
  Christmas Cards 1
  Christmas Cards 2
  Christmas Cards 3
  Tag Art
  Christmas Cards 4
  Birthday
  Floral
  Happy Birthday
  Presents
  Pirates
  Ice-cream
  Christmas Cards 5
Chalking
Chipboard
Circles
  New Friends
  Ikebukuro
  Stitch
  Santa
  Angels
  Disney Cruise
  Beauty
  Toontown
Collages
  Friendship
  Design Team 2
  Heritage
  Inking
  Inking 2
  Distressing
  Brothers
  Sanbutsudo
Colour Blocking
  Chatterbox
  Dreams on Parade
Diamond Folding
Doodling
Fancy Frames
  Suzy's Zoo
  Land of Nod
  Hoppy Easter
  Daydreamer
  Sundae
  Wedding
  Futarasan
Flowers
  Template
  Journey
Glitter
Inking
  Australia
  More Inking
  Dimension
  Water
  Raspberries
  Rinnoji
Journaling
  Creative Titles
  Hidden Journalling
  Mini Envelopes
  Creative Titles 2
  Without Photos
  Creative Titles 3
  Destination
  Journaling Hearts
Matting
  Lilo & Stitch
  4th Birthday
Mini Albums
  Floral
  Little Book
  Squash Book
  Baby Boy
  Baby Girl
  About You
  Sunbursts
  Christmas
Microscope Slides
Mulberry Paper
Paper Tearing
  Koalas
  Christmas
  Dimension 1
  Dimension 2
  Sky Rail
  Toontown
  Christmas
  Monuments
  Shiba Park
Patterned Papers
  Combining Papers
  Choosing Papers
  Co-ordinating
  Paper Collections
  Paper Collections 2
  Matching
  Layering 1
  Layering 2
  Embellish 1
  Embellish 2
  Embellish 3
  Simply You
  Boys
  Cairns
  Locals
  Ashleigh
  So Happy Together
  Love
  B'day Flowers
  Turns 3
  Fishing w/ Dad
  Too Cute
  Turns 13
  Asakusa
  My First Day
  Curious Cat
  Disney
Rub-ons
Scrapbooking Sketches
  Sketches 1
  Sketches 2
  Paisley
  Petals
  Fatherhood
  Beach Babes
  Sketches 7
Serendipity Squares
  The Basics
  Baby Girl
Sewing
  At the Park
  Sunshine
Shaker Boxes
Scrapbooking Stickers
Tags
  The Basics
  Tag Border
  Suzy's Zoo Tags
  Cat with Kittens
  Journaling Tags
  Design Team 4
  Stickers & Tags