Scrapbooking Stickers

Barbie Stickers

Posted on June 8, 2009 by Jennifer Gormly

Tags: , , ,

Barbie Stickers

Barbie stickers are the perfect embellishment for a young lady or little princess. They are feminine and youthful but can also carry a sense of style and elegance. This week, I have used Barbie stickers to create a soft and sweet greeting card. Pay particular attention to the unique background. It is so easy to do and could be used to add personality to any of your scrapbooking and card making designs.

Click Here To View Our Range Of Barbie Stickers

Barbie Stickers

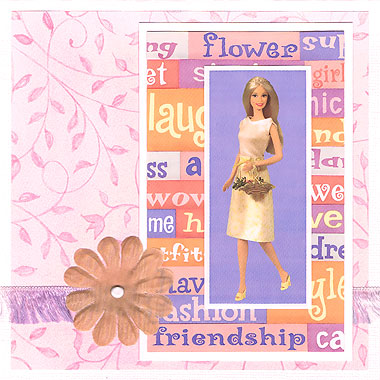
This card was created using white Bazzill cardstock, MM Colors By Design paper, white cardstock, pastel eyelash fibre, an orange/pink flower from Bazzill, a small white brad and Barbie Phrases stickers.

To recreate this card making idea, follow these steps:

1. Cut a piece of white Bazzill cardstock measuring 5 1/2 inches by 11 inches (14cm by 28cm). Fold in half to create a card. Place it in front of you so the fold is along the top edge.

2. Cut a piece of MM Colors By Design paper measuring 13cm by 13cm. Glue to the centre of your card.

3. Cut a piece of pastel eyelash fibre about 16cm long. Wrap around your card approximately 3.5cm from the bottom edge, as shown in the layout above. Make sure you secure it well at the back (you don’t want it falling off later). I just used photo tabs, but use whatever adhesive you are comfortable with.

4. Cut a piece of white cardstock measuring 7.2cm by 11.7cm.

5. Select a phrase sticker from your Barbie Phrases stickers (I have chosen one that says ‘friendship’) and stick in the bottom left corner of your white cardstock from the previous step. Working up and across, cover the whole piece of cardstock with different phrase stickers. It doesn’t matter which ones you use, but try to mix up the colours and sizes a little for variety.

6. Mat your cardstock covered in phrases from the previous step with white cardstock and glue on the right side of your card.

7. Select a Barbie sticker from your sheet of Barbie stickers and mat with white cardstock. Glue on top of your phrases as shown above, making sure it is slightly off-centre.

8. Finally, using a small white brad attach an orange/pink flower towards the bottom left corner of your card.

What do you think? Do you like this card making idea using Barbie stickers? Do you have any questions? Would you have done anything different? We’d love to hear from you! Please leave a comment below.

Click Here For More Scrapbooking Ideas

Related Posts:

This entry was posted on Monday, June 8th, 2009 at 5:49 pm and is filed under Card Making, Girl. You can follow any responses to this entry through the RSS 2.0 feed. You can leave a response, or trackback from your own site.

Comments

2 Responses to “Barbie Stickers”

  1. sidra on May 8th, 2010 2:08 am

    i love barbie stickers this a very good company i love it keep it up

  2. prachi on February 6th, 2011 9:28 pm

    i want some more good ideas

Leave a Reply


Card Making Ideas eBook
Subscribe for your free email newsletter full of great scrapbooking ideas and your FREE Birthday Card Making Ideas eBook.

Enter your details below:

First name:

E-mail:

 
More Info
Scrapbooking Sketches
Card Making Sketches
Quotes
Sketches
Book Of Me
Old Scrapbooking Ideas

The Basics
Beginners Guide
History
Colour Wheel
Glossary

Techniques
Quick Layouts
  Lots of Photos
  The Wharf
  Crabs
  Country Bears
  Asian
Altered Items
  Travel Box
  Paint Tins
  Frames
  Clipboard
  Magnet
Backgrounds
  Beauty
  Buzz
  Long Walk
  Christmas
  Our House
Borders
  Sequences
  Nature
  Leaves
  Christmas Borders
  Stamp Borders
  Colour Blocking
  Kitty
  Rainforest
  Sir William Mog
  Playful
  Daisy
  Swimming
Card Making
  Easter
  Floral Cards
  Christmas Cards 1
  Christmas Cards 2
  Christmas Cards 3
  Tag Art
  Christmas Cards 4
  Birthday
  Floral
  Happy Birthday
  Presents
  Pirates
  Ice-cream
  Christmas Cards 5
Chalking
Chipboard
Circles
  New Friends
  Ikebukuro
  Stitch
  Santa
  Angels
  Disney Cruise
  Beauty
  Toontown
Collages
  Friendship
  Design Team 2
  Heritage
  Inking
  Inking 2
  Distressing
  Brothers
  Sanbutsudo
Colour Blocking
  Chatterbox
  Dreams on Parade
Diamond Folding
Doodling
Fancy Frames
  Suzy's Zoo
  Land of Nod
  Hoppy Easter
  Daydreamer
  Sundae
  Wedding
  Futarasan
Flowers
  Template
  Journey
Glitter
Inking
  Australia
  More Inking
  Dimension
  Water
  Raspberries
  Rinnoji
Journaling
  Creative Titles
  Hidden Journalling
  Mini Envelopes
  Creative Titles 2
  Without Photos
  Creative Titles 3
  Destination
  Journaling Hearts
Matting
  Lilo & Stitch
  4th Birthday
Mini Albums
  Floral
  Little Book
  Squash Book
  Baby Boy
  Baby Girl
  About You
  Sunbursts
  Christmas
Microscope Slides
Mulberry Paper
Paper Tearing
  Koalas
  Christmas
  Dimension 1
  Dimension 2
  Sky Rail
  Toontown
  Christmas
  Monuments
  Shiba Park
Patterned Papers
  Combining Papers
  Choosing Papers
  Co-ordinating
  Paper Collections
  Paper Collections 2
  Matching
  Layering 1
  Layering 2
  Embellish 1
  Embellish 2
  Embellish 3
  Simply You
  Boys
  Cairns
  Locals
  Ashleigh
  So Happy Together
  Love
  B'day Flowers
  Turns 3
  Fishing w/ Dad
  Too Cute
  Turns 13
  Asakusa
  My First Day
  Curious Cat
  Disney
Rub-ons
Scrapbooking Sketches
  Sketches 1
  Sketches 2
  Paisley
  Petals
  Fatherhood
  Beach Babes
  Sketches 7
Serendipity Squares
  The Basics
  Baby Girl
Sewing
  At the Park
  Sunshine
Shaker Boxes
Scrapbooking Stickers
Tags
  The Basics
  Tag Border
  Suzy's Zoo Tags
  Cat with Kittens
  Journaling Tags
  Design Team 4
  Stickers & Tags