
I’ve always had a fascination with trains and train stickers. I’m not sure why. Perhaps because my Dad has always been interested in trains and when I was little, he let me play with his train set (which now, unfortunately, lives in the top of a cupboard). So when I saw our new 3D train stickers from EK Success’s Jolee’s range, I just knew I had to find a way to use them.
Click Here To View Our Range Of Jolee’s Stickers
These photos were taken during our visit to McComick Railroad Park in Arizona. Aren’t the train stickers just perfect for them? I love the way they just pop out of the page.
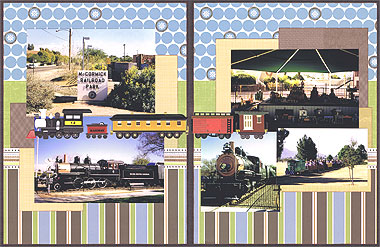
Materials Used: Dark brown cardstock, background paper from Scrapbooking Memories magazine, KI Sand Linen paper, Patchwork Cocoa Patchwork paper, American Traditions gold paper, Sassafras Lass Striped paper, brown ink and EK Success 3D Trains stickers.
To recreate this scrapbooking idea using train stickers, follow these steps:
1. Cut two pieces of dark brown cardstock each measuring 21.6cm by 28cm. These will be your backgrounds for your two scrapbooking pages.
2. Cut two pieces of background paper each measuring 20.8cm by 27.3cm. Lightly ink the edges with brown ink. When dry, glue one in the centre of one page and the other in the centre of the other page.
3. Cut two pieces of Sassafras Lass Striped paper each measuring 20.8cm by 1.4cm. Glue one across on page approximately 9.3cm from the bottom edge. Repeat for the other page.
Now focus on the left page:
4. Cut a piece of KI Sand Linen paper measuring 7.3cm by 7.1cm. Lightly ink the edges with brown ink. When dry, glue on the left side of your page approximately 2.2cm from the left edge and 4.1cm from the bottom edge.
5. Cut a second piece of KI Sand Linen paper measuring 4cm by 10.5cm. Lightly ink the edges with brown ink. When dry, glue on the right side of your page approximately 1.4cm from the right edge and 6.2cm from the top edge.
6. Cut a piece of Patchwork Cocoa Patchwork paper measuring 3cm by 5.1cm. Lightly ink the edges with brown ink. When dry, glue on the left side of your page approximately 1.2cm from the left edge and 11.2cm from the bottom edge.
7. Glue a horizontal 4×6 photo towards the bottom of your page so it is approximately 3.9cm from the left edge and 5cm from the bottom edge. Make sure you can cover a significant amount of the top quarter of your photo as this is where your train stickers will go.
8. Glue a second horizontal 4×6 photo towards the top of your page. It should be approximately 3cm from the left edge and sit on top of your first photo.
9. Place three of your 3D train stickers (including the engine) across the top of your first photo, as shown above. You have now finished the left page of this double-page layout.
Now focus on the right page:
10. Cut a piece of KI Sand Linen paper measuring 11cm by 2.5cm. Lightly ink the edges with brown ink. When dry, glue on the right side of your page approximately 1cm from the right edge and 6.3cm from the bottom edge.
11. Cut a second piece of KI Sand Linen paper measuring 7.5cm by 11cm. Lightly ink the edges with brown ink. When dry, glue on the left side of your page approximately 2.9cm from the left edge and 4.4cm from the top edge.
12. Cut a piece of Patchwork Cocoa Patchwork paper measuring 10.1cm by 10cm. Lightly ink the edges with brown ink. When dry, glue on the right side of your page approximately 1.3cm from the right edge and 3.2cm from the top edge.
13. Cut a piece of American Traditions gold paper measuring 2cm by 4.6cm. Lightly ink the edges with brown ink. When dry, glue on the right side of your page approximately 0.9cm from the right edge and 11.2cm from the bottom edge.
14. Crop a vertical 4×6 photo down to approximately 9.2cm by 9cm. Glue to your page approximately 1.2cm from the left edge and 4cm from the bottom edge.
15. Glue a horizontal 4×6 photo above your first photo. It should be approximately 2.4cm from the right edge and sit on top of your first photo.
16. Crop a third photo down to approximately 10.3cm by 7.2cm. Glue to your page approximately 1.4cm from the right edge and 7cm from the bottom edge. It will overlap your other two photos.
17. Finally, place your remaining two 3D train stickers across the top of your first photo, as shown above. Make sure you line it up with the other train stickers on your first page.
Now you have a fabulous two-page layout featuring EK Success’s 3D Train stickers!
Click Here To View Our Range Of Jolee’s Stickers
I’d love to hear your thoughts and ideas for using train stickers on your layouts and what you think of this page. Please leave a comment in the comments box below.


