
Your kitchen is not just a place where you prepare food but it’s a place where the whole family can get together, catch up on the day’s activities and even have a little fun. So why not capture your kitchen and cooking memories in your scrapbooking albums? There are plenty of cooking-related scrapbooking supplies like cooking stickers that you can use to scrap your favourite memories. You can even scrap your favourite recipes.
Click Here To View Our Range Of Cooking Stickers
In this layout, I have use the brand new Karen Foster Kitchen Cooking stickers to create a “In the Kitchen” layout.
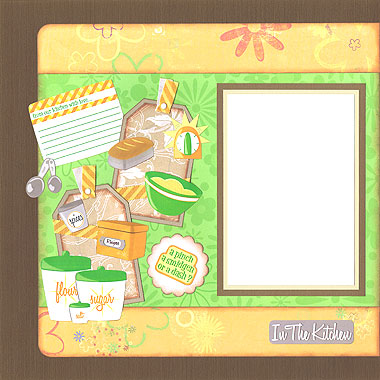
Materials Used: Three shades of brown Bazzill cardstock, Provo Craft Green Flowers paper, Deja Views Tangerine Flower Fresh Print paper, Foofala Brown Ivy paper, white cardstock, light brown cardstock, white Bazzill cardstock, two shades of brown ink, a brown pen, two white brads, orange ribbon from Bo Bunny and Karen Foster Kitchen Cooking stickers.
To recreate this scrapbook page idea, follow these steps:
1. Use the darkest shade of brown Bazzill cardstock as your background.
2. Cut a piece of Provo Craft Green Flowers paper measuring 27.3cm by 22cm. Ink the left and right edges with brown ink. Lightly ink again with dark brown ink. When dry, glue to your page so that it is centred and up against the right edge of your page.
3. Cut a piece of Deja Views Tangerine Flower Fresh Print paper measuring 27.3cm by 4cm. Round the top left corner. Ink the edges with brown ink. Lightly ink again with dark brown ink. When dry, glue to across your page so that it is approximately 2cm from the top edge and up against the right edge. It will slightly overlap your green paper.
4. Cut a second piece of Deja Views Tangerine Flower Fresh Print paper measuring 27.3cm by 4cm. Round the bottom left corner. Ink the edges with brown ink. Lightly ink again with dark brown ink. When dry, glue to across your page so that it is approximately 2cm from the bottom edge and up against the right edge. It will slightly overlap your green paper.
You have now created your background.
5. Mat a vertical 4×6 photo with white cardstock. Mat again with light brown cardstock and again with you middle shade of brown Bazzill cardstock. Glue to your page within the green section and approximately 1.2cm from the right edge.
It is now time to create your tags.
6. Cut two pieces of Foofala Brown Ivy paper, each measuring 5.5cm by 9cm. Cut the top corners of both to create a tag shape. Ink the edges of both with brown ink. Lightly ink again with dark brown ink. Then, using a brown pen, draw a border around each tag.
7. Mat both tags with your lightest shade of brown Bazzill cardstock and lightly ink the edges of both with your darkest shade of brown ink.
8. Cut two piece of orange ribbon, each about 9cm long. Wrap one around the first tag so that it starts towards the bottom left corner and finishes about one third the way up the right side.
9. Wrap one piece of ribbon around the first tag so that it starts towards the bottom left corner and finishes about one third the way up the right side. Please refer to the picture above for exact placement.
10. Wrap the second piece of ribbon around the second tag so that it starts towards the top left corner and finishes about one third the way down the right side. Please refer to the picture above for exact placement.
11. Cut out a flower shape from white cardstock. You may wish to use a template or punch to do this. Ink the edges with brown ink. Lightly ink again with dark brown ink and place the ‘A pinch a smidgen or a dash?’ sticker in the middle.
You now have the elements you need to create the collage to the right of the photo – two tags, a flower shape and your Kitchen cooking stickers.
12. Arrange your stickers and tags as shown in the layout above. You may want to place around with your arrangement before you stick anything down. You also have room to add journaling on the ‘From our kitchen with love” sticker.
13. One everything has been stuck down, cut two more piece of orange ribbon, each approximately 5cm long. Fold them in half and secure them at the top of each tag with a white brad, as shown above.
14. Finally, place the ‘In the Kitchen” cooking sticker towards the bottom right corner of your page, as shown above, for your title.
And there you have it! A cheerful and fun layout for showcasing your fun in the kitchen photos!
Click Here To View Our Range Of Cooking Stickers
I’d love to hear your thoughts and ideas for using cooking stickers on your layouts and what you think of this page. Please leave a comment in the comments box below.


