
I scrap a lot of photos taken at various birthday celebrations throughout the year. As a result, I have many pages embellished with birthday cakes, candles and balloons. But sometimes, when scrapbooking a birthday layout I move away from the traditional birthday motifs and choose a theme that focuses more on the personality of the birthday boy or girl. For example, I have embellished this layout with Fairy stickers.
Click Here To View Our Full Range Of Fantasy Stickers
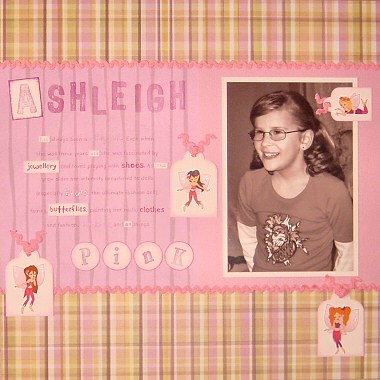
The photo was taken at my niece’s birthday party, but instead of focusing on the celebrations, I wanted to focus on the young lady she was growing up to be. I chose a sophisticated colour scheme of pinks (bright pinks, not baby pinks) and browns to show her maturity and mixed in several sweet fairy stickers to show her youth. I also added character to my journaling by mixing up my fonts. Try using some of these techniques in your own pages.
Materials Used: Daisy D’s Daughter Plaid paper, Paper Garden Watermelon Ribbon Stripe paper, Bazzill Cardstock (pink and pale pink), pink cardstock, pink ric-rac, Amethyst ink pad, Petal Pink ink pad, alphabet stamps (2 fonts), pink pens, glitter and Sandylion Pink Fairy stickers.
To recreate this scrapbooking idea, follow these steps:
1. Use the plain pink cardstock as your background. It will be completely covered, so the exact colour is not important.
2. Cut two strips of Daisy D’s Daughter Plaid paper each. The first should be approximately 5.5cm tall and the other should be approximately 8cm tall. Adhere the smaller strip across the top of your page and the larger strip along the bottom.
3. Mat a vertical 4×6 photo on pale pink Bazzill cardstock giving it 5mm border all the way around your photo. Mat again on pink Bazzill cardstock. This time the border should be approximately 1cm at the top and bottom and 2cm at the sides. Your photo mat should now be approximately 18cm tall.
4. Cut a piece of Paper Garden Watermelon Ribbon Stripe paper. This will be your journaling block. You will have to calculate the size of this piece based on the size of your matted photo. It should be the same height as your matted photo (approximately 18cm tall) and when placed next to your matted photo, the width of the two pieces together should add up to the width of your page (i.e. 12 inches). You may wish to make this piece slightly wider than necessary and allow your photo to overlap it once adhered to the page.
5. Now is the tricky bit – your journaling. Consider what you would like to say in your journaling and how you would like to arrange it on your journaling block. Jot it down on some scrap paper so you know what you are working with.
6. Begin with the first word of your journaling. This goes across the top of your journaling block and should be the largest word. In my case, I stamped the word ‘Ashleigh’ across the top. Try not to line up your letters perfectly – sometimes the haphazard look is much more effective.
I also stamped the letter ‘A’ on a rectangle of pale pink Bazzill cardstock, inked the edges of the rectangle with the same ink and used that for my first letter of my title to make it stand out.
7. Add the last word of your journaling across the bottom of your journaling block. Make sure you leave plenty of room on the left for the fairy tag that you will add later. The last word of my journaling is ‘pink.’ I used a different stamp set and stamped each letter on a circular piece of pale pink Bazzill cardstock. I then inked the edges of each circle with Petal Pink ink and Amethyst ink before adhering them along the bottom of my journaling block.
8. Write the rest of your journaling in between the two words you have created. Write directly on your Watermelon Striped paper with a pink pen. Every now and then, add emphasis to certain words by switching to a purple pen and writing in a larger, fancier font.
9. Select a few other words you would like to emphasise. Write these words on small pieces of pale pink Bazzill cardstock and cut into rectangles. Ink the edges of the rectangles with petal pink ink and glue in place.
10. Adhere your journaling block to the left side of your page, in between the two pieces of plaid paper you have already glued across the top and bottom of your page. It should overlap slightly with each of them.
11. Adhere your photo mat next to your journaling block. Make sure you position it so the top and bottom edges are in line with the top and bottom edges of your journaling block.
12. Cut two pieces of pink ric-rac. Adhere across your page to cover both joins between your plaid strips and your journaling block and photo mat.
13. Finally, cut four small tags from pale pink Bazzill cardstock. One should be smaller than the other three. Ink the edges with petal pink ink and punch a hole in the top. Select four Sandylion Pink Fairy stickers and adhere one in the centre of each tag. If you wish, you can add a little glitter to their wings. Thread a small piece of pink ric-rac through each hole and adhere your fairy tags as shown in the layout above.
Now you have a sophisticated page to delight any pre-teen!
Click Here To View Our Full Range Of Fantasy Stickers
I’d love to hear what you think about this fairy stickers scrapbooking idea. Please leave a comment in the comments box below.


It’s hard to find well-informed people for this topic, but you seem like you know what you’re talking about!
Thanks
Thanks for sharing such a nice idea, article is good, thats
why i have read it entirely
Whats up very nice website!! Man .. Excellent ..
Amazing .. I’ll bookmark your web site and take the feeds also?
I am glad to search out so many useful info right here in the put up,
we want develop extra techniques in this regard, thanks for sharing.
. . . . .