Scrapbooking Stickers

Karen Foster Stickers

Posted on May 4, 2008 by Jennifer Gormly

Tags: , , , ,

Karen Foster Stickers

Karen Foster stickers continue to provide unique and intriguing designs for embellishing your pages and adding a touch of sophistication. Each sheet comes with enough stickers for either a single page or double page layout and they are so easy and quick to use. The following layout shows how to use a classic design for a single page layout that took less than half an hour to complete.

Karen Foster Stickers

This layout was created using It Takes Two Green Fibre paper, brown stripe paper, green cardstock, gold letters, a brown pen and Karen Foster Redwood Forest stickers.

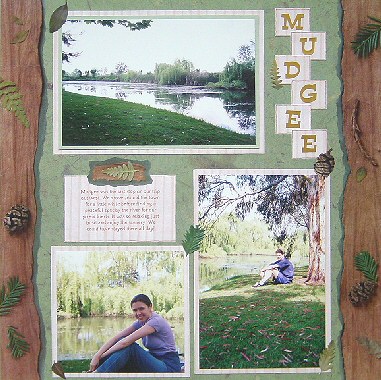
To recreate this scrapbook page idea, follow these steps:

1. Use the It Takes Two Green Fibre paper as your background. If you do not have this paper, any nature green paper will do.

2. Position your border stickers down the left and right sides of your page and stick down. To minimise the risk of making a mistake with your placement, I recommend roughly cutting the sticker out while still on its backing paper. When you are ready to adhere it to your page, peal back a corner of the backing paper. Stick that corner in place and slowly pull the backing paper away from the rest of the sticker with one hand while sticking it in place with the other. This will make it much easier to get it straight and in the desired position.

3. Mat your main horizontal 4×6 photo with green cardstock and again with brown stripe paper. Glue towards the top left corner of your page, as shown above.

4. Mat your vertical 4×6 photo with brown stripe paper. Glue towards the bottom right corner of your page, as shown above.

5. Mat your remaining photo with brown stripe paper. Glue towards the bottom left corner of your page, as shown above.

6. To create your title, cut one square of brown stripe paper for each letter of your title. Place a gold letter in the centre of a square. Instead of matting the square, draw a border around the edges with a brown pen. Position your letters, one above the other in the top right corner of your page and adhere. Your arrangement will depend on how many letters you have. Overlap them if necessary.

7. Cut a rectangle of brown stripe paper for your journaling box. Use a brown pen to journal and then draw a brown border around the edges as you did with the letters. Glue to your page in the remaining space between your photos.

8. Finally, use the remainder of your stickers to decorate and embellish your layout.

What do you think? Do you like this scrapbooking idea? Do you have any questions? Would you have done anything different? We’d love to hear from you! Please leave a comment below.

Click Here For More Scrapbooking Ideas

Related Posts:

This entry was posted on Sunday, May 4th, 2008 at 10:51 pm and is filed under Outdoors, Quick Scrapbooking Ideas, Scrapbooking Stickers. You can follow any responses to this entry through the RSS 2.0 feed. You can leave a response, or trackback from your own site.

Comments

Leave a Reply


Card Making Ideas eBook
Subscribe for your free email newsletter full of great scrapbooking ideas and your FREE Birthday Card Making Ideas eBook.

Enter your details below:

First name:

E-mail:

 
More Info
Scrapbooking Sketches
Card Making Sketches
Quotes
Sketches
Book Of Me
Old Scrapbooking Ideas

The Basics
Beginners Guide
History
Colour Wheel
Glossary

Techniques
Quick Layouts
  Lots of Photos
  The Wharf
  Crabs
  Country Bears
  Asian
Altered Items
  Travel Box
  Paint Tins
  Frames
  Clipboard
  Magnet
Backgrounds
  Beauty
  Buzz
  Long Walk
  Christmas
  Our House
Borders
  Sequences
  Nature
  Leaves
  Christmas Borders
  Stamp Borders
  Colour Blocking
  Kitty
  Rainforest
  Sir William Mog
  Playful
  Daisy
  Swimming
Card Making
  Easter
  Floral Cards
  Christmas Cards 1
  Christmas Cards 2
  Christmas Cards 3
  Tag Art
  Christmas Cards 4
  Birthday
  Floral
  Happy Birthday
  Presents
  Pirates
  Ice-cream
  Christmas Cards 5
Chalking
Chipboard
Circles
  New Friends
  Ikebukuro
  Stitch
  Santa
  Angels
  Disney Cruise
  Beauty
  Toontown
Collages
  Friendship
  Design Team 2
  Heritage
  Inking
  Inking 2
  Distressing
  Brothers
  Sanbutsudo
Colour Blocking
  Chatterbox
  Dreams on Parade
Diamond Folding
Doodling
Fancy Frames
  Suzy's Zoo
  Land of Nod
  Hoppy Easter
  Daydreamer
  Sundae
  Wedding
  Futarasan
Flowers
  Template
  Journey
Glitter
Inking
  Australia
  More Inking
  Dimension
  Water
  Raspberries
  Rinnoji
Journaling
  Creative Titles
  Hidden Journalling
  Mini Envelopes
  Creative Titles 2
  Without Photos
  Creative Titles 3
  Destination
  Journaling Hearts
Matting
  Lilo & Stitch
  4th Birthday
Mini Albums
  Floral
  Little Book
  Squash Book
  Baby Boy
  Baby Girl
  About You
  Sunbursts
  Christmas
Microscope Slides
Mulberry Paper
Paper Tearing
  Koalas
  Christmas
  Dimension 1
  Dimension 2
  Sky Rail
  Toontown
  Christmas
  Monuments
  Shiba Park
Patterned Papers
  Combining Papers
  Choosing Papers
  Co-ordinating
  Paper Collections
  Paper Collections 2
  Matching
  Layering 1
  Layering 2
  Embellish 1
  Embellish 2
  Embellish 3
  Simply You
  Boys
  Cairns
  Locals
  Ashleigh
  So Happy Together
  Love
  B'day Flowers
  Turns 3
  Fishing w/ Dad
  Too Cute
  Turns 13
  Asakusa
  My First Day
  Curious Cat
  Disney
Rub-ons
Scrapbooking Sketches
  Sketches 1
  Sketches 2
  Paisley
  Petals
  Fatherhood
  Beach Babes
  Sketches 7
Serendipity Squares
  The Basics
  Baby Girl
Sewing
  At the Park
  Sunshine
Shaker Boxes
Scrapbooking Stickers
Tags
  The Basics
  Tag Border
  Suzy's Zoo Tags
  Cat with Kittens
  Journaling Tags
  Design Team 4
  Stickers & Tags