
When I first saw these pansy stickers, I knew I had to find a way to use them. They are just too pretty not to use. I love working with flowers, but the truth is, coming up with scrapbooking ideas for pansies did present me with quite a challenge. I have always associated pansies with my grandmother (she always seems to be growing them), but I wanted to do something not so obvious with them. This is what I came up with. What do you think?
Click Here To View Our Full Range Of Flower Stickers
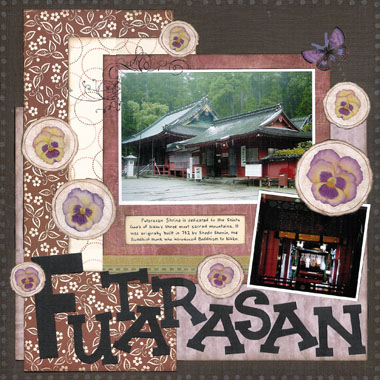
By placing my pansies inside irregular circles, I have been able to mix a bit of the old with the new. It was the perfect contrast for my photos of Futarasan Shrine in Japan. This old world shrine is part of the World Heritage area in Nikko, but still plays a significant role in modern day Japan.
This layout was created using brown Bazzill cardstock, Purple Stripes paper (brand unknown), Scenic Route Charlotte Brown Floral Paper, Karen Foster Red Scratch paper, Creative Imaginations Brown Linen paper, white cardstock, cream cardstock, black cardstock, brown ink, white ink, a brown pen, a black pen, a small flower or asterisk stamp, Basic Grey Flourishes rub-ons and NRN Designs Pansies stickers.
To recreate this scrapbook page idea, follow these steps:
1. Use the brown Bazzill cardstock as your background.
2. Using a small flower or asterisk stamp and white ink, stamp a border all the way around the outside of your brown Bazzill cardstock. Leave to dry.
3. Cut a piece of Purple Stripes paper measuring approximately 27.8cm by 20cm. Ink the edges with brown ink. When dry, scrunch up into a ball and then flatten out. This gives your paper a little extra character. Adhere horizontally to your background about 1.5cm from the left edge and 1.4cm from the bottom edge.
4. Cut a piece of Scenic Route Charlotte Brown Floral Paper measuring approximately 12cm by 28.4cm. Ink the edges with brown ink. When dry, glue vertically to your page about 2cm from the left edge and 1cm from the bottom edge.
5. Cut a piece from the underside of Scenic Route Charlotte Brown Floral Paper measuring approximately 10cm by 18.5cm. Ink the edges with brown ink. When dry, glue vertically to your page about 5.5cm from the left edge and 3cm from the top edge.
6. Cut a piece of Red Scratch paper measuring approximately 18cm by 18cm. Ink the edges with brown ink. When dry, glue to your page about 4cm from the right edge and 4.5cm from the top edge.
7. Using one of your border stickers, cut a piece that is 18cm long. Adhere horizontally across the red scratch paper, approximately 1cm above the bottom edge of that paper.
8. Mat a horizontal 4×6 photo with white cardstock and position on the red scratch paper. It should be about 1.2cm from the top edge of the red paper and 1.2cm from the right edge of the red paper.
9. Select a flourish rub-on and place in around the top left corner of your 4×6 photo, as shown in the layout above.
10. Mat a horizontal 3×4 photo with whit cardstock. Glue at an angle over the bottom right corner of your larger photo, as shown in the layout above.
11. Cut out a piece of cream cardstock measuring approximately 9.5cm by 2.5cm. Using a black pen, add your journaling on this piece. Ink the edges with brown ink and when dry, glue in the space between your large photo and the border sticker.
12. Cut out your title from black cardstock and glue across the bottom of the page.
13. Select a collection of pansy stickers you wish to use on your page. The larger ones may have stems attached – cut them off. Cut a circle from Creative Imaginations Brown Linen paper for each of them. Slowly tear around the edge of the circle to give a white edge. Then, ink the brown ink. Also, draw an imperfect circle inside the circle, close to the outer edge. You may also like to smudge the whole area with brown ink for added effect. Stick a pansy sticker inside each circle and then glue your circles around your page, as shown in the layout above.
14. Finally, place a butterfly sticker towards the top right corner of your page. If you wish, you may also like to add a white dotted line below it to indicate its flight path.
Click Here To View Our Full Range Of Flower Stickers
What do you think? Do you like this scrapbooking idea? Do you have any questions? Would you have done anything different? We’d love to hear from you! Please leave a comment below.


Hi. All of your scrapbking pages are amazing. I was wondering, what would be a good way to preserved real dead flowers onto a page. My boyfriend gave me roses and I want to incorporate them into a page, without getting them ruined. I don’t plan on using the entire rose petal, just a few.
Thanks,
Camille
Reachout Wireless phone…
Pansy Scrapbooking Ideas…