
Scrapbooking ideas with circles are playful and a lot of fun. I love the fluidity you can create with circles without disrupting the balance (you all know I LOVE balance!). In this page I have used circles and stickers to create an ‘Under The Sea’ feel to my page. My photo was taken at Tokyo Disney Sea, but this idea is easily adaptable to any beach or even bath time photos. What do you think?
Also, just as an aside, I really do adore the Little Mermaid Glitter stickers I have used. Glitter is wonderful but I am sometimes frustrated by the mess it makes when specks of it fall off the sticker. That doesn’t happen with these Sandylion stickers as the glitter is sealed within the sticker so you get all the sparkle without the mess.
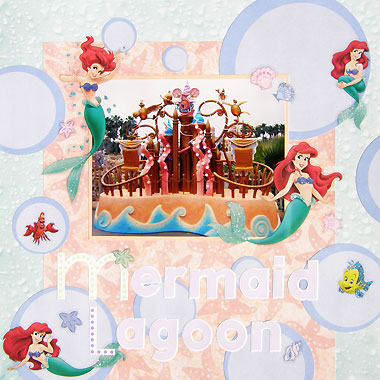
This layout was created using Karen Foster Light Green Droplets paper, Paper Adventures Starfish paper, Pebbles Inc Winter Circle paper, orange Bazzill cardstock, white cardstock, purple alphabet stickers, Doodlebug Designs Pastel Party Alphabet stickers, Doodlebug Designs Bright Party Alphabet stickers and Sandylion Little Mermaid Glitter stickers.
To recreate this scrapbook page idea, follow these steps:
1. Use Karen Foster Light Green Droplets paper as your background.
2. Cut a piece of Paper Adventures Starfish paper measuring approximately 23cm by 27cm. Glue vertically to your layout centred and along the bottom.
3. Cut out a collection of blue circles from Pebbles Inc Winter Circle paper. If you do not have this paper, you can make your own with two shades of blue cardstock. Glue the largest circle in the top right corner of your page, as shown in the layout above.
4. Place one of the smaller Little Mermaid stickers near the edge of the circle, as shown in the layout above.
5. Mat a 5×7 photo with orange Bazzill cardstock. Glue to your layout so that it is centred horizontally and approximately 6cm from the top edge of the page.
6. Glue your remaining circles around the page to surround your photo, as shown in the layout above.
7. Place a Little Mermaid sticker so it overlaps the top left corner of your photo, and another so it overlaps the bottom right corner of your photo. Also, place two shells in the top right corner of the photo.
8. Place one of the smaller Little Mermaid stickers in the bottom left corner, as shown above.
9. Decide on your title. Use Doodlebug Designs Party alphabet stickers to select a sticker for the first letter of each word. (I have used Doodlebug Designs Pastel Party Alphabet stickers for the ‘m’ and Doodlebug Designs Bright Party Alphabet stickers for the ‘L’). Use purple alphabet stickers (or letters cut from purple cardstock) for the rest of the letters. Mat these with white cardstock so they stand out from your background. Arrange your title under your photo, as shown in the layout above. The first letter of the second word should cover some of your mermaid sticker in the bottom left corner.
10. Finally, place some of the smaller stickers around your page for extra decoration.
What do you think? Do you like this scrapbooking idea? Do you have any questions? Would you have done anything different? We’d love to hear from you! Please leave a comment below.


I just started started scrapbooking and wanted to start a Disney album first. Was looking for design ideas and this was the first one I found — absolutely love it! How creative! Am hoping to become creative myself through experience.
Woah this blog will be amazing i like examining your site content. Keep up the best work! You’re sure, many individuals are searching rounded because of this facts, you could possibly make them drastically.
When I initially left a comment I appear to have clicked on the -Notify me
when new comments are added- checkbox and from now on each time a comment is
added I receive four emails with the same comment.
Perhaps there is a means you can remove me from that service?
Many thanks!
best value inn columbia mo…
Scrapbooking Ideas With Circles…
Good post however , I was wondering if you could write a
litte more on this subject? I’d be very thankful if you could elaborate a little bit
further. Kudos!
If you want to improve your knowledge only keep visiting this web page
and be updated with the most recent gossip posted here.
Hello friends, pleasant piece of writing and fastidious arguments commented here, I am really enjoying by these.
A perrson essentially assist to make critically
articles I would state. That is the first time I frequented your
web page and thus far? I amazed with the research you made to make this particular publish incredible.
Excellent task!
This post is really a nice one it helps new web users, who are wishing in favor oof blogging.