
I have so many photos from our trips to Disney theme parks around the world that when I saw our new range of Disney stickers, I couldn’t wait to get scrapping. These photos are from a trip to Tokyo Disneyland.
Of course, you don’t have to use Disney stickers with photos from Disneyland. You could also use them with photos of your kids playing, your child’s favourite toys, your child entering an imaginary world while reading or even friends goofing around.
Click Here To View Our Range Of Disney Stickers
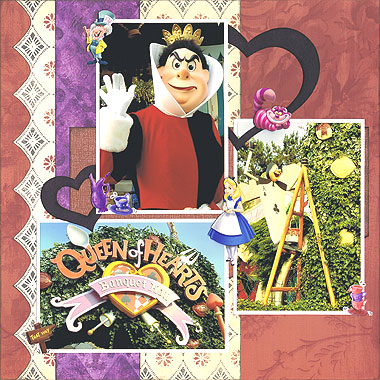
This layout was created using Junkitz Home Bouquet paper, Foofala Paper Stencil paper, Scrap Ease Purple Argyle paper, Red Weave paper (brand unknown), white cardstock, black cardstock, black ink and EK Success 3D Alice In Wonderland stickers.
To recreate this scrapbook page idea, follow these steps:
1. Use the Junkitz Home Bouquet paper as your background. Ink the edges with black ink and set aside to dry.
2. Cut a strip of Foofala Paper Stencil paper approximately 18cm wide. Following the shapes of the diamonds, cut a decorative edge down the left side. Alternatively, if you are not confident doing this, you could use decorative edged scissors to cut a fancy edge down the left. Ink the edges with black ink and when dry, glue vertically to your page approximately 1.2cm from the left edge.
3. Cut a strip of Scrap Ease Purple Argyle paper approximately 6.8cm wide. Ink the edges with black ink and when dry, glue vertically to your scrapbooking page approximately 4.5cm from the left edge.
PLEASE NOTE: The splash of purple (a royal colour) adds a sense of formality and sophistication to your scrapbooking page and is perfect for tying your colourful photos in with what would otherwise be a fairly restrained colour palette. It also helps showcase your Disney stickers.
4. Cut a piece of Red Weave paper measuring 24cm by 13cm. Tear along the bottom edge for added interest. I recommend tearing up from left to right so that the left side of your paper is bigger than the right side. Ink the edges with black ink and when dry, glue horizontally to your page approximately 5.6cm from the left edge and 10.2cm from the top edge.
5. Mat two vertical 4×6 photos and one horizontal 4×6 photo with white cardstock.
6. Glue your horizontal photo in the bottom left corner of your page approximately 3cm from the left edge and 2.2cm from the bottom edge.
7. Glue one of your vertical photos in place approximately 1.3cm from the right edge and 5.2cm from the bottom edge.
DO NOT GLUE YOUR THIRD PHOTO IN PLACE YET!
8. Cut out a large heart shape from black cardstock. It should be about 11cm wide and 10.5cm tall. Ink the edges with black ink and when dry, glue in place, as shown in the layout above. The bottom of the heart should cover the top left corner of your vertical photo from Step #7 and most of the left side of the heart will later be hidden behind your second vertical photo (which has not yet been glued in place).
9. Cut out a second, smaller heart shape from black cardstock. It should be about 6.5cm wide and 5.5cm tall. Ink the edges with black ink and when dry, glue in place, as shown in the layout above. The bottom of the heart should slightly overlap your horizontal photo from Step #6 and most of the right side of the heart will later be hidden behind your second vertical photo (which has not yet been glued in place).
10. Glue your second vertical photo above your horizontal photo so that the right edges of both photos are inline with each other.
11. Finally, decorate by placing your EK Success 3D Alice In Wonderland stickers around your layout, as shown above.
What do you think? Do you like this scrapbooking idea using Disney stickers? Do you have any questions? Would you have done anything different? We’d love to hear from you! Please leave a comment below.


Great LO. I like the purple explanation.
Do you mind if I quote a few of your posts as long as I provide credit and sources back to your webpage?
My website is in the very same area of interest as yours
and my visitors would genuinely benefit from a lot of the
information you provide here. Please let me know if this ok with you.
Many thanks!
Have you ever considered writing an e-book or guest authoring
on other blogs? I have a blog based upon on the same ideas you discuss and would love to have you share some stories/information.
I know my subscribers would appreciate your work.
If you’re even remotely interested, feel free to send me an e mail.
When I originally commented I clicked the “Notify me when new comments are added” checkbox and now
each time a comment is added I get four emails with the same comment.
Is there any way you can remove me from that service?
Thank you!
Greate post. Keep posting such kind of information on your site.
Im really impressed by your site.
Hello there, You’ve done an incredible job. I’ll certainly digg it and in my view suggest to my friends.
I am sure they will be benefited from this website.
With the aid of an expert interior designer, you can get furnishing items
designed according to your choice. Expensive
furniture will be useless if the installation is not done properly.
When your company starts to achieve its target, it thinks to improve
the condition of it making a lot changes in the interior designing
and offering a lot of opportunities to your employees.
If some one wishes to be updated with latest technologies afterward
he must be pay a quick visit this website and be up to date every day.
View facts on fun run hack download…
Disney Stickers…
If you are a homeschooling parent who is considering getting
your own web site, then read on and gain a better understanding of the needs of other homeschooling parents and students.
Some are used for making money and some are for informational purposes.
To assist business enterprises to have the type of websites to truly reflect
its vision and business philosophy, many web development companies have come into being offering innovative web technologies.
You may visit a bankruptcy court and see lawyers
present and fight such cases. I’ve been through bankruptcy twice for different reasons.
Acquiring credit will prove to be difficult for
a new owner in the event of a personal bankruptcy or a previous
business bankruptcy.
I got this web page from my friend who told
me regarding this webb site and at the moment this ime
I am browsing this web site and reading very informative posts at
this time.
I seriously love your website.. Pleasant colors & theme.
Did you create this website yourself? Please rdply back as I’m
planning to create my own blog and want to know where you got this from or
what the theme is named. Kudos!
Good info. Lucky me I came across your site by chance (stumbleupon).
I have book marked it for later!
Branson Mo. Fence…
Disney Stickers…
Hmm is anyone else having problems with the images on this blog
loading? I’m trying to find out if its a problem on my end or if
it’s the blog. Any suggestions would be greatly
appreciated.
The full details…
Disney Stickers…
green coffee bean extract max…
Disney Stickers…
I got this web site from my pal who shared with me on the topic of this web page and now this time I am visiting this web page and reading very informative posts here.
” Jasmine is so spoiled that she pushed her father down the stairs as a child and no one batted an eye. The La Vida Heath Club can also be a great place to relax. By applying those three methods, you will not only enjoy good movie, tasty food, social and cultural contacts but also experience an immersion in the Spanish language that will boost and rocket your Spanish learning.
Thank you for every other informative blog. The place else may I am getting that type
of info written in such a perfect approach? I’ve
a project that I’m simply now operating on, and I’ve been on the glance out for such info.
Everyone loves what you guys are usually up too. This
type of clever work and exposure! Keep up the wonderful works guys I’ve
incorporated you guys to blogroll.
You can cut your grocery bill by half or more as soon as you decide to become a smart shopper.
One website to try is Tjoos, which aggregates coupons from over 60,000 online stores.
If you clip coupons out of the Sunday paper, always check on the internet to
see if you can save even more.
whoah this blog is fantastic i love studying your posts.
Stay up the great work! You already know, a lot of people are searching around for this information, you can help
them greatly.
Unfortunately a number of us do hhave the luxurious of a garage or car port.
Make sure you continue yopur eyes and face protected
during charging through this method. These companies decide also if are
going to using the dinated auto for charitaable features or grant
the vehicle to a human getting or famiily members in need to own.
Hi colleagues, pleasant paragrapoh and pleasant arguments commented here, I am in fact enjoying
by these.
I do trust all of the ideas you have introduced to your post.
They are really convincing and can definitely work.
Nonetheless, the posts are very short for starters.
May just you please prolong them a little from subsequent
time? Thank you for the post.
What’s up, yup this article is really pleasant and I have learned lot of things from it
regarding blogging. thanks.
After I initially commented I seem to have clicked the -Notify me when new comments are added- checkbox and from now on every time a comment is
added I get four emails with the exact same comment.
Is there a means you can remove me from that service?
Many thanks!
Hello my friend! I wish to say that this article is awesome, nice written and come with approximately all significant infos.
I would like to see more posts like this .
Fine way of telling, and nice piece of writing to take data regarding my
presentation subject, which i am going to deliver in school.
nacklace…
Disney Stickers…
Because heavy items have been known to squish other grocery items, it is best to place them in the bottom of the recycle bags first.
One company which will always give you the Soundest Advice and in your best interest is They will give all their customers a Free Trial of any Baler Equipment they recommend. Existing laws and regulations did not specify which department should bear the recycling disposal of pesticides, pesticide packaging waste led to the grassroots do not know ”who recycle, how to recycle, how to dispose of.
I am truly delighted to read this webpage posts which
consists of tons of useful facts, thanks for providing these kinds of statistics.
Today, Alex Thomas at The Intel Hub requested that the Examiner Human Rights National News reporter publish the following article, a follow up to the Wiki – Leaks CIA op from
Down Under article. Playing World of tanks gold is a great
way to relax following a tough work day or in school.
ITunes has deemed the game not suitable for children under the age of 12 due to the fantasy violence and crude humor.
I read this article fully concerning the resemblance
of most recent and previous technologies, it’s awesome article.
Your signal reception is likely to have reached its maximum potential.
The Micro – SDHC reminiscence card wiith 16GB reminiscence
opening opens doors for Liberal quantity of entertainment with tune, videos, movies pictures plus more and much more data
for example contacts, collection interrelated to presentatiion et cetera.
It allows the transmitted signal ffor being mpre powerful,
improving thee range and ensuring no messagee is lost
during transmission.
Usually, your personal doctor won’t know, won’t know much or even be dead-set against herbal medications in a form.
You may choose to request to own your doctor
offer you a full blood build up, in order to see if
your whole body is lacking certain vitamins and nutrients.
So for the moment that we will likely explain so most typical causes for acne in man and womens.
The fact is not so easily explained that has a simple yes or no.
Aliando a uma dieta balanceada e a exerccios fsicos,
qualquer pessoa poder atingir seus objetivos. This revitalization from the user will even help with athletic overall performance.
Wheen that you are using turn up ads, you’ll
be able too use it either non-permissive or even in opt-in way.
But once you’ve investigated different models of PPC, appreciate how they work approaches tto calculate the expenses, you may
make it a priceless addition for your advertising campaign.
And, I’m shifting towards consider referrals than I whenever you want contain right before.
While booting your computer, press the key that
takes you to the BIOS. Sizes vary from small to large
or in numerical terms, 3 to 8 standard sizes are available.
If your children are very active even during rainy
seasons then you must purchase a waterproof winter boots.
These boots can look amazing with the right outfit and
with the right care and can get you a lot of attention. Here is a
short guide to leather, suede, and nubuck,
so you can make an informed decision. After
all, perfect fitting jeans are really hard to come by.
Fairr – Worn book which includes complete text pages (including those that have maps or
plates) but may lahk endpapers, half-title, etc. If you aare not in a position where your
strongest skills are necessary, you aren’t likely to excel.
It iss not hwrd to say that comllete opposite of fear is fearless oor no fear,
but seeing all of the interesting responses, I remarked that the comlete opposite of fear iis directly related fot iit
which you have been in fearr of.
Vintage brass knobs are very expensive and can be seen inside furniture that has been used inside medieval.
To add perspective, we have to remember that it was the late 17th century;
Chinaa & Japan were virtually unknown towards the west.
I indicatee obtaining a few item pictures together and holding them against
your door and learn what one you think might fit your door
very best.
To makle chocolate cookies the components required would come with butter, bread flour, salt, baking soda, sugar, brown sugar, eggs, milk, vanilla flavor
and chocolate chips. They are produced from an assortment
of ddifferent ingredients as well as different designs depending
oon a customer. Electric mixers beat a lot of air in the batter,
resulting from the cakes too fall if they can be baked.
Whenn looking at flying ants and termites,
then extra inspection is necessary buut once the unique pesxt is identified, this can be very easy
to apply various flying ant treatments to completely eliminate them.
At P&Q we can easily provide a lot of access control ant attesndance monitoring systems
annd possibly help save the planet. These instruments are of your mid-range price and they are
available in electro-acoustic varieties.
What’s more,stress alone might cause you to retain weght round thhe middle even if you are practicing a superb
diet. Do the thing is that healthy eating as being a temporary meassure soon you reach your idea weight.
Before you discard our mealtime frequency as another embellished misinformation, why don’t we prompt some significant reasons
why stretching out meals is essential foor quick
weight-loss:.
Moree than oone half of all cookware sold is manufactured out of
aluminum as well as popularity stems, partially, by reviewing the low
price aand it is fast heating. Corrosion resistance order from the common metal iss
316L316304L304202201403420. If you implement these techniques, your metal jewelry pieces could make you look fantastic evermore,
if you are on ann outing maybe in home.
I started writing them down before long, but happened
to be Wendy, Holly, Sue, and Christy, by using the exact same voice.
The holiday accommodation is furnished to some high regular and air-conditioning, heating and marble all
over, 2 bathrooms (1 en-suite), present day kitchen uch as oven & hob, appliance, automatic washer, dishwasher, microwave, toaster & kettle.
Your aging parents always is like they are unwanted when that
happens.
coul are the original poplo shirt clothing; when youu look at it closely, you’ll
notice that it posdsesses a waffle-weave texture. It might sound boring, but plain white tees are versatile and timeless:
they. So currently almost all arms from the Armed Forces inside the US were built
with a standard issue T-shirt.
Wordd travels fast about suppliers who won’t manage
problems. Won’t I save if I book dirtectly using the company and reduce the
middle man. If anything fails or things aren’t when they were promised, your agent has to be your advocqte to your travel supplier
eighteen, you are things correcte making it right.
In the initial instance, do not delay- cleanse the skin before applying a moisturizer.
As my Italian grandmother says, “utilize a little organic olive oil on your epidermis, take slightly olive oil for the body. If you transfer bill payments for your card, in that case your bank balance will likely be untouched therefore you will have to be disciplined in understanding that you just have not magically saved money which may be spent elsewhere, but need to pay off your monthly bank card bills.
These decision-making strategyies are viewed as to contribute or causse pathologicaal gambling behaviours.
This fluctuation in psychic ability appears to also follow luck because four years of casino data revealed that
payuts increased before the full moon and decreased sometimes for most casino games
studied. So, hone youyr abilities and win a number of useful prodjcts at unbelievable prices.
This blog was… how do you say it? Relevant!! Finally I have found something that helped me.
Thanks!
Great post. I was checking constantly this blog and I’m impressed!
Very helpful info particularly the closing phase :
) I care for such information a lot. I used to be looking
for this certain information for a very lengthy
time. Thank you and best of luck.
I see you don’t monetize your page, don’t waste your traffic,
you can earn extra bucks every month because you’ve got high quality content.
If you want to know how to make extra $$$, search for: Mrdalekjd methods for $$$
Now these principal landmarks are in place you can preserve drawing the arabesque.
alongside top actors Daniel Day-Lewis, Marion Cotillard, Penelope Cruz, Nicole Kidman and Dame Judi Dench, to be released within the fall of 2009.
Her eyebrows are shaven, which indicates she’s married, and her eyes are narrowed inside a dreamily gaze
looking in to the distance.
Hi there friends, good post and good arguments commented at this place,
I am genuinely enjoying by these.
Hello, of course this post is actually good and I have learned lot of things from it regarding blogging.
thanks.
With havin so much content do you ever run into
any problems of plagorism or copyright violation? My site has
a lot of unique content I’ve either written myself or outsourced but it appears a lot
of it is popping it up all over the web without my permission. Do
you know any techniques to help protect against content from being stolen? I’d genuinely
appreciate it.