Scrapbooking Stickers

Mickey Mouse Stickers

Posted on March 8, 2011 by Jennifer Gormly

Tags: , ,

Mickey Mouse Stickers

I always love it when we have new Sandylion stickers because it means I get to do one of my favourite things – creating Disney scrapbooking layouts. They are a great excuse for playing with bright colours and fun stickers. In this layout, I have used our brand new Mickey Mouse stickers to embellish my Disney World photos. I just love these foam stickers. They really pop out from your page.

Click Here To View Our Range Of Disney Stickers

Mickey Mouse Stickers

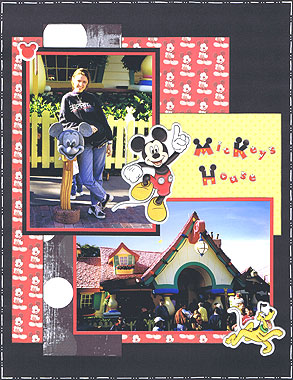
Materials Used: Black cardstock, Sandylion Mickey Poses paper, Junkitz Basics Circle Black paper, Beary Patch Sunbeary Dot paper, red cardstock, black ink, a white pen, Disneyland Alphabet stickers and Sandylion Mickey Mouse Foam stickers.

To recreate this Mickey Mouse scrapbooking idea, follow these steps:

1. Cut a piece of black cardstock measuring 21.6cm by 28cm. This will be your background.

2. Use a white pen to draw a border around the edges of your black cardstock. I have used a combination of dots and dashes, but you can draw whatever type of border you wish.

3. Cut a piece of Sandylion Mickey Poses paper measuring 16cm by 22.5cm. Lightly ink the edges with black ink. When dry, glue to the left side of your page approximately 0.8cm from the left edge and 2.7cm from the top edge.

4. Cut a piece of Junkitz Basics Circle Black paper measuring 5.8cm by 24.4cm. Lightly ink the edges with black ink. When dry, glue down the left side of your page approximately 3.2cm from the left edge and 1.7cm from the top edge.

5. Cut a piece of Beary Patch Sunbeary Dot paper measuring 10cm by 9cm. Lightly ink the edges with black ink. When dry, glue on the right side of your page approximately 0.8cm from the right edge and 8.3cm from the top edge.

6. Mat a horizontal 4×6 photo with red cardstock and glue to your page approximately 1.5cm from the right edge and 3.3cm from the bottom edge.

7. Crop a vertical 4×6 photo so it is approximately 9cm by 12.5cm. Mat with red cardstock and again with black cardstock. Glue to your page approximately 1.6cm from the left edge and 3.5cm from the top edge.

8. Select three foam stickers (I have used Mickey Mouse, Pluto and red Mickey ears) and position around your page, as shown above.

9. Finish off your page by using alphabet stickers of your choice to write your title in the remaining space on your yellow paper.

You now have a cheerful Disney scrapbooking page using Mickey Mouse stickers that can’t help but make you smile.

Click Here To View Our Range Of Disney Stickers

I’d love to hear your thoughts and ideas for using Mickey Mouse stickers on your layouts and what you think of this page. Please leave a comment in the comments box below.

Related Posts:

This entry was posted on Tuesday, March 8th, 2011 at 7:47 pm and is filed under Disney, Scrapbooking Stickers. You can follow any responses to this entry through the RSS 2.0 feed. You can leave a response, or trackback from your own site.

Comments

Leave a Reply


Card Making Ideas eBook
Subscribe for your free email newsletter full of great scrapbooking ideas and your FREE Birthday Card Making Ideas eBook.

Enter your details below:

First name:

E-mail:

 
More Info
Scrapbooking Sketches
Card Making Sketches
Quotes
Sketches
Book Of Me
Old Scrapbooking Ideas

The Basics
Beginners Guide
History
Colour Wheel
Glossary

Techniques
Quick Layouts
  Lots of Photos
  The Wharf
  Crabs
  Country Bears
  Asian
Altered Items
  Travel Box
  Paint Tins
  Frames
  Clipboard
  Magnet
Backgrounds
  Beauty
  Buzz
  Long Walk
  Christmas
  Our House
Borders
  Sequences
  Nature
  Leaves
  Christmas Borders
  Stamp Borders
  Colour Blocking
  Kitty
  Rainforest
  Sir William Mog
  Playful
  Daisy
  Swimming
Card Making
  Easter
  Floral Cards
  Christmas Cards 1
  Christmas Cards 2
  Christmas Cards 3
  Tag Art
  Christmas Cards 4
  Birthday
  Floral
  Happy Birthday
  Presents
  Pirates
  Ice-cream
  Christmas Cards 5
Chalking
Chipboard
Circles
  New Friends
  Ikebukuro
  Stitch
  Santa
  Angels
  Disney Cruise
  Beauty
  Toontown
Collages
  Friendship
  Design Team 2
  Heritage
  Inking
  Inking 2
  Distressing
  Brothers
  Sanbutsudo
Colour Blocking
  Chatterbox
  Dreams on Parade
Diamond Folding
Doodling
Fancy Frames
  Suzy's Zoo
  Land of Nod
  Hoppy Easter
  Daydreamer
  Sundae
  Wedding
  Futarasan
Flowers
  Template
  Journey
Glitter
Inking
  Australia
  More Inking
  Dimension
  Water
  Raspberries
  Rinnoji
Journaling
  Creative Titles
  Hidden Journalling
  Mini Envelopes
  Creative Titles 2
  Without Photos
  Creative Titles 3
  Destination
  Journaling Hearts
Matting
  Lilo & Stitch
  4th Birthday
Mini Albums
  Floral
  Little Book
  Squash Book
  Baby Boy
  Baby Girl
  About You
  Sunbursts
  Christmas
Microscope Slides
Mulberry Paper
Paper Tearing
  Koalas
  Christmas
  Dimension 1
  Dimension 2
  Sky Rail
  Toontown
  Christmas
  Monuments
  Shiba Park
Patterned Papers
  Combining Papers
  Choosing Papers
  Co-ordinating
  Paper Collections
  Paper Collections 2
  Matching
  Layering 1
  Layering 2
  Embellish 1
  Embellish 2
  Embellish 3
  Simply You
  Boys
  Cairns
  Locals
  Ashleigh
  So Happy Together
  Love
  B'day Flowers
  Turns 3
  Fishing w/ Dad
  Too Cute
  Turns 13
  Asakusa
  My First Day
  Curious Cat
  Disney
Rub-ons
Scrapbooking Sketches
  Sketches 1
  Sketches 2
  Paisley
  Petals
  Fatherhood
  Beach Babes
  Sketches 7
Serendipity Squares
  The Basics
  Baby Girl
Sewing
  At the Park
  Sunshine
Shaker Boxes
Scrapbooking Stickers
Tags
  The Basics
  Tag Border
  Suzy's Zoo Tags
  Cat with Kittens
  Journaling Tags
  Design Team 4
  Stickers & Tags