Scrapbooking Stickers

Paper House Stickers

Posted on March 1, 2011 by Jennifer Gormly

Tags: , , ,

Paper House Stickers

Our new range of Paper House stickers are the perfect sized embellishment for creating beautiful and one-of-a-kind handmade cards for your friends and family. And their realistic appearance makes them extra special. So I decided to feature one of my favourites (the Gardenias sticker) on my latest card. I hope you like it!

Click Here To View Our Range Of Paper House Stickers

Paper House Stickers

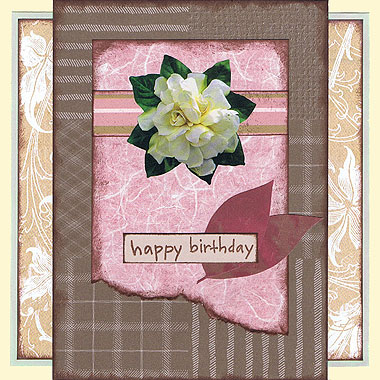
Materials Used: Cream cardstock, green cardstock, Foofala brown patterned paper, Patchwork Cocoa Plaid paper, It Takes Two Pink Fibre paper, Scrapbooking Memories Pink and Brown paper, Basic Grey paper (for the leaves), brown cardstock, brown ink, pink ink, a ‘Happy Birthday’ stamp and Paper House Gardenias stickers.

To recreate this card making idea, follow these steps:

1. Cut a piece of cream cardstock measuring 14cm by 28cm. Fold in half to create a card. Place in front of you with the fold down the left side.

2. Cut a piece of Foofala brown paper measuring 12.6cm by 12.6cm. Ink the edges with brown ink. When dry, mat with green cardstock. Ink the edges of the green cardstock with pink ink and when dry, glue to the centre of your card.

3. Cut a piece of Patchwork Cocoa Plaid paper measuring 10cm by 14cm. Ink the edges with brown ink. When dry, glue down the centre of your card, as shown above.

4. Cut a piece of It Takes Two Pink Fibre paper measuring 7.2cm by 11cm. Tear along the bottom edge, as shown in the card idea above. Ink the edges with brown ink and when dry, glue in the centre of your card.

5. Cut a piece of Scrapbooking Memories Pink and Brown paper measuring 7.2cm by 1.6cm. Ink the edges with brown ink. When dry, glue across your pink fibre paper approximately 1.9cm from the top edge.

6. Place your Gardenia sticker so that it is centred on top of your pink and brown paper from step #5.

7. Cut out two leaf shapes from Basic Grey paper (or any paper of your choosing). Arrange them one on top of the other towards the bottom right corner of your pink fibre paper, as shown in the card idea above. When you are happy with their placement, glue them down.

8. Using brown ink, stamp a ‘happy birthday’ message on a piece of brown cardstock. When dry, cut down to size and then ink the edges with brown ink. Again, when dry, glue to your card, as shown above.

And you’re done! You now have a beautiful and unique birthday card to give someone special on their next birthday. And as you can see, the Paper House sticker makes a gorgeous central feature of your design.

Click Here To View Our Range Of Paper House Stickers

I’d love to hear your thoughts and ideas for using Paper House stickers on your layouts and what you think of this page. Please leave a comment in the comments box below.

Related Posts:

This entry was posted on Tuesday, March 1st, 2011 at 8:24 pm and is filed under Birthday, Card Making. You can follow any responses to this entry through the RSS 2.0 feed. You can leave a response, or trackback from your own site.

Comments

Leave a Reply


Card Making Ideas eBook
Subscribe for your free email newsletter full of great scrapbooking ideas and your FREE Birthday Card Making Ideas eBook.

Enter your details below:

First name:

E-mail:

 
More Info
Scrapbooking Sketches
Card Making Sketches
Quotes
Sketches
Book Of Me
Old Scrapbooking Ideas

The Basics
Beginners Guide
History
Colour Wheel
Glossary

Techniques
Quick Layouts
  Lots of Photos
  The Wharf
  Crabs
  Country Bears
  Asian
Altered Items
  Travel Box
  Paint Tins
  Frames
  Clipboard
  Magnet
Backgrounds
  Beauty
  Buzz
  Long Walk
  Christmas
  Our House
Borders
  Sequences
  Nature
  Leaves
  Christmas Borders
  Stamp Borders
  Colour Blocking
  Kitty
  Rainforest
  Sir William Mog
  Playful
  Daisy
  Swimming
Card Making
  Easter
  Floral Cards
  Christmas Cards 1
  Christmas Cards 2
  Christmas Cards 3
  Tag Art
  Christmas Cards 4
  Birthday
  Floral
  Happy Birthday
  Presents
  Pirates
  Ice-cream
  Christmas Cards 5
Chalking
Chipboard
Circles
  New Friends
  Ikebukuro
  Stitch
  Santa
  Angels
  Disney Cruise
  Beauty
  Toontown
Collages
  Friendship
  Design Team 2
  Heritage
  Inking
  Inking 2
  Distressing
  Brothers
  Sanbutsudo
Colour Blocking
  Chatterbox
  Dreams on Parade
Diamond Folding
Doodling
Fancy Frames
  Suzy's Zoo
  Land of Nod
  Hoppy Easter
  Daydreamer
  Sundae
  Wedding
  Futarasan
Flowers
  Template
  Journey
Glitter
Inking
  Australia
  More Inking
  Dimension
  Water
  Raspberries
  Rinnoji
Journaling
  Creative Titles
  Hidden Journalling
  Mini Envelopes
  Creative Titles 2
  Without Photos
  Creative Titles 3
  Destination
  Journaling Hearts
Matting
  Lilo & Stitch
  4th Birthday
Mini Albums
  Floral
  Little Book
  Squash Book
  Baby Boy
  Baby Girl
  About You
  Sunbursts
  Christmas
Microscope Slides
Mulberry Paper
Paper Tearing
  Koalas
  Christmas
  Dimension 1
  Dimension 2
  Sky Rail
  Toontown
  Christmas
  Monuments
  Shiba Park
Patterned Papers
  Combining Papers
  Choosing Papers
  Co-ordinating
  Paper Collections
  Paper Collections 2
  Matching
  Layering 1
  Layering 2
  Embellish 1
  Embellish 2
  Embellish 3
  Simply You
  Boys
  Cairns
  Locals
  Ashleigh
  So Happy Together
  Love
  B'day Flowers
  Turns 3
  Fishing w/ Dad
  Too Cute
  Turns 13
  Asakusa
  My First Day
  Curious Cat
  Disney
Rub-ons
Scrapbooking Sketches
  Sketches 1
  Sketches 2
  Paisley
  Petals
  Fatherhood
  Beach Babes
  Sketches 7
Serendipity Squares
  The Basics
  Baby Girl
Sewing
  At the Park
  Sunshine
Shaker Boxes
Scrapbooking Stickers
Tags
  The Basics
  Tag Border
  Suzy's Zoo Tags
  Cat with Kittens
  Journaling Tags
  Design Team 4
  Stickers & Tags