Scrapbooking Stickers

House Mouse Stickers

Posted on April 20, 2011 by Jennifer Gormly

Tags: , , ,

House Mouse Stickers

How adorable are our new House Mouse stickers! They are just so cute! I couldn’t resist playing them so I thought I would share one of my creations with you. This card is very easy to make and is perfect for any romantic occasion like Valentines Day, an anniversary or even the birthday of someone special.

Click Here To View Our Range Of House Mouse Stickers

House Mouse Stickers

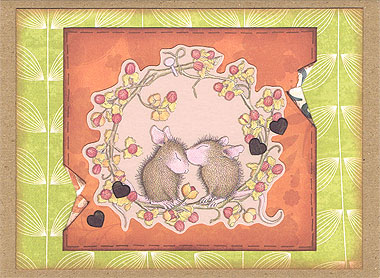
Materials Used: Brown cardstock, Bo Bunny Olivia Honeydew paper, Bo Bunny Olivia Mums paper (the underside), light brown cardstock, light brown ink, brown ink, a brown pen, a small heart punch and House Mouse Leaves and Berries Mice stickers.

To recreate this adorable card making idea using House Mouse stickers, follow these steps:

1. Cut a piece of brown cardstock measuring 15cm by 22cm. Fold in half to create a card. Place in front of you with the fold along the top.

2. Cut a piece of Bo Bunny Olivia Honeydew paper measuring 13.7cm by 10.3cm. Ink the edges with light brown ink. When dry, glue in the centre of your card.

3. Cut a piece from the underside of Bo Bunny Olivia Mums paper measuring 10cm by 8.8cm. Ink the edges with light brown ink. Ink again with brown ink (make sure it is a much darker shade than the first ink). When dry, use a brown pen to draw a dashed border around your piece.

Finally, make two small tears (one on the left side, one on the right) and fold down the flaps, as shown above. Then glue in the centre of your card.

4. Stick your chosen House Mouse sticker on light brown cardstock. Cut out around the edges of the sticker. The sticker itself as a clear background, so you have now given it a light brown background. Glue in the centre of your card.

5. To finish off, use your small heart punch to punch four hearts from the underside of your Bo Bunny Olivia Honeydew paper. If you wish, use your brown pen to draw an outline around the edge of each heart (this just helps them stand out a little more). Glue two on the left side of your card and two on the right side, as shown in the card making idea above.

And you’ve finished your super cute House Mouse card!

Click Here To View Our Range Of House Mouse Stickers

I’d love to hear your thoughts and ideas for using House Mouse stickers on your layouts and what you think of this card. Please leave a comment in the comments box below.

Related Posts:

This entry was posted on Wednesday, April 20th, 2011 at 12:31 pm and is filed under Card Making, Love. You can follow any responses to this entry through the RSS 2.0 feed. You can leave a response, or trackback from your own site.

Comments

3 Responses to “House Mouse Stickers”

  1. Laura on April 29th, 2011 4:24 pm

    Fantastic, Jenny, very creative.
    Laura

  2. Lisa Morice on May 17th, 2011 12:41 pm

    I LOVE House Mouse products and your choice of colours and simple design show the stickers off perfectly. Thank you.

  3. Jen on May 31st, 2011 4:34 pm

    Thanks so much for your kind comments. I’m so glad you like my card. I’m rather fond of it too. :)
    Jen :)

Leave a Reply


Card Making Ideas eBook
Subscribe for your free email newsletter full of great scrapbooking ideas and your FREE Birthday Card Making Ideas eBook.

Enter your details below:

First name:

E-mail:

 
More Info
Scrapbooking Sketches
Card Making Sketches
Quotes
Sketches
Book Of Me
Old Scrapbooking Ideas

The Basics
Beginners Guide
History
Colour Wheel
Glossary

Techniques
Quick Layouts
  Lots of Photos
  The Wharf
  Crabs
  Country Bears
  Asian
Altered Items
  Travel Box
  Paint Tins
  Frames
  Clipboard
  Magnet
Backgrounds
  Beauty
  Buzz
  Long Walk
  Christmas
  Our House
Borders
  Sequences
  Nature
  Leaves
  Christmas Borders
  Stamp Borders
  Colour Blocking
  Kitty
  Rainforest
  Sir William Mog
  Playful
  Daisy
  Swimming
Card Making
  Easter
  Floral Cards
  Christmas Cards 1
  Christmas Cards 2
  Christmas Cards 3
  Tag Art
  Christmas Cards 4
  Birthday
  Floral
  Happy Birthday
  Presents
  Pirates
  Ice-cream
  Christmas Cards 5
Chalking
Chipboard
Circles
  New Friends
  Ikebukuro
  Stitch
  Santa
  Angels
  Disney Cruise
  Beauty
  Toontown
Collages
  Friendship
  Design Team 2
  Heritage
  Inking
  Inking 2
  Distressing
  Brothers
  Sanbutsudo
Colour Blocking
  Chatterbox
  Dreams on Parade
Diamond Folding
Doodling
Fancy Frames
  Suzy's Zoo
  Land of Nod
  Hoppy Easter
  Daydreamer
  Sundae
  Wedding
  Futarasan
Flowers
  Template
  Journey
Glitter
Inking
  Australia
  More Inking
  Dimension
  Water
  Raspberries
  Rinnoji
Journaling
  Creative Titles
  Hidden Journalling
  Mini Envelopes
  Creative Titles 2
  Without Photos
  Creative Titles 3
  Destination
  Journaling Hearts
Matting
  Lilo & Stitch
  4th Birthday
Mini Albums
  Floral
  Little Book
  Squash Book
  Baby Boy
  Baby Girl
  About You
  Sunbursts
  Christmas
Microscope Slides
Mulberry Paper
Paper Tearing
  Koalas
  Christmas
  Dimension 1
  Dimension 2
  Sky Rail
  Toontown
  Christmas
  Monuments
  Shiba Park
Patterned Papers
  Combining Papers
  Choosing Papers
  Co-ordinating
  Paper Collections
  Paper Collections 2
  Matching
  Layering 1
  Layering 2
  Embellish 1
  Embellish 2
  Embellish 3
  Simply You
  Boys
  Cairns
  Locals
  Ashleigh
  So Happy Together
  Love
  B'day Flowers
  Turns 3
  Fishing w/ Dad
  Too Cute
  Turns 13
  Asakusa
  My First Day
  Curious Cat
  Disney
Rub-ons
Scrapbooking Sketches
  Sketches 1
  Sketches 2
  Paisley
  Petals
  Fatherhood
  Beach Babes
  Sketches 7
Serendipity Squares
  The Basics
  Baby Girl
Sewing
  At the Park
  Sunshine
Shaker Boxes
Scrapbooking Stickers
Tags
  The Basics
  Tag Border
  Suzy's Zoo Tags
  Cat with Kittens
  Journaling Tags
  Design Team 4
  Stickers & Tags