
Simplicity is the key to quick scrapbooking ideas. By minimising the number of supplies you are using and sticking to a straight-lined balanced page it is very easy to create a sophisticated layout in a short amount of time. Here is an example of a scrapbooking layout you can put together yourself in under half an hour.
This layout was created using Scenic Route Charlotte Hill Stripe Paper, Scenic Route Charlotte Brown Floral Paper, three shades of brown cardstock, brown ink and small brown alphabet stickers.
Click Here To View Scenic Route Charlotte Hill Stripe Paper
Click Here To View Scenic Route Charlotte Brown Floral Paper
To recreate this scrapbook page idea, follow these steps:
1. Use the underside of the Scenic Route Charlotte Hill Stripe Paper as your background.
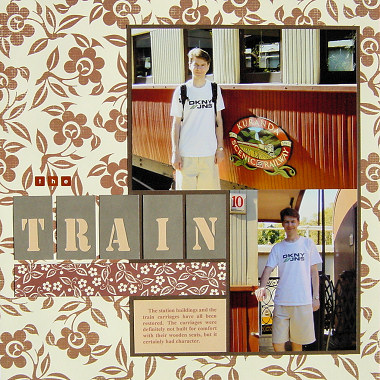
2. Take your darkest shade of brown cardstock and adhere a vertical 5×7 photo in the top right rand corner leaving a border of at least 3mm around it. Adhere a vertical, smaller photo directly beneath it on the right side, as shown in the layout above.
3. Cut out a rectangle around your photos, as shown in the layout above. The border around the photos should be at least 3mm.
4. Adhere your rectangle vertically towards the right side of your page.
5. Cut out a rectangle of your lightest shade of brown cardstock to fit in the bottom left corner of your rectangle. Make sure it is not too high as you have to fit other pieces above it. Add your journaling and adhere in position.
6. Cut out five rectangles measuring approximately 3cm by 5cm from your middle shade of brown cardstock. Cut the shape of a letter out of the middle of each one to make the large word of your title. You may wish to position your letters towards the bottom of each rectangle rather than in the middle, as shown in the layout above. To draw your letters, try using a template or printing them from your computer.
7. Place your lightest shade of brown cardstock behind each rectangle from the previous step so the colour comes through the letters you have cut out.
8. Adhere your title across your page underneath your large photo, as shown in the layout above. Use small brown alphabet stickers to add other words to your title (for example, I have added the word ‘The’ above my large letters).
9. Measure the gap between the bottom of your large photo and the top of your journaling piece (mine was 3.2cm). Subtract around 6mm from this measurement (gives me 2.6cm). Now measure the length your large letters have taken (mine was 16.7cm). You now have the dimensions for the strip of Scenic Route Charlotte Brown Floral Paper that you need to cut. Once you have cut it out, ink the edges with brown ink and adhere directly underneath your large letters.
What do you think? Do you like this scrapbooking idea? Do you have any questions? Would you have done anything different? We’d love to hear from you! Please leave a comment below.


Impresionante vídeo porno de sexo anal en el que vemos cómo el
culo de una zorrita joven es perforado sin piedad.