
Flowers make a great embellishment for just about any layout. It doesn’t really matter what type of flowers you use. Paper flowers, stickers, stamps, rub-ons, overlays – they are all good. But I must admit, I really enjoy cutting out flowers from different patterned papers. It gives me the chance to play with lots of different colours and styles without much expense. So, when I saw this green floral Scenic Route paper, I knew I was going to have some fun!
This layout was created using Scenic Route Sentimental White Daisy paper, Scenic Route Sentimental Dots paper, Scenic Route Hampton Belwood Floral paper, Scenic Route Capetown Devonport paper, light brown cardstock, brown ribbon, a black pen and Cloud 9 Sorbet Flowers Glitter Rub-Ons.
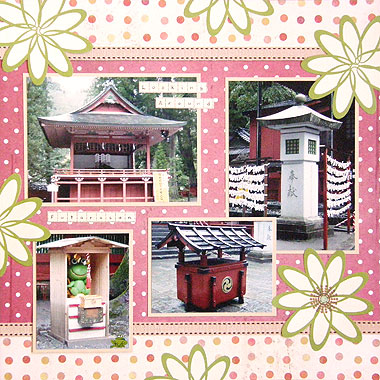
To recreate this scrapbook page idea, follow these steps:
1. Use the underside of the Scenic Route Sentimental White Daisy paper as your background.
2. Cut a strip of Scenic Route Sentimental Dots paper approximately 4cm tall. Glue horizontally along the top of your page.
3. Cut a strip of brown ribbon approximately 32cm long. Glue horizontally to your page so that it covers the line where your sentimental dots paper meets the red dots paper.
4. Cut another strip of Scenic Route Sentimental Dots paper approximately 4cm tall. Glue horizontally along the bottom of your page.
5. Cut a second strip of brown ribbon approximately 32cm long. Again, glue horizontally to your page so that it covers the line where your second sentimental dots paper meets the red dots paper.
6. Mat two 4×6 photos and two 3×4 photos with light brown cardstock. Arrange on your page as shown above and glue down.
7. Cut out a collection of flower shapes from Scenic Route Hampton Belwood Floral paper. Remember, you only need one complete flower – the rest can be incomplete. Glue your complete flower in the bottom right corner of your page so that it slightly overlaps your photos. Glue the rest around the edges of your page, as shown above.
8. Use the grid paper on the underside of Scenic Route Capetown Devonport paper to create your title. For each word of your title, count the number of letters. Then, cut out a piece of grid paper with that many squares in a row. For example, the first word of my title is ‘looking.’ It has seven letters so I cut out a piece with seven squares. Use a black pen to write in your title – one letter per square. Glue your title in and around your photos. Your exact placement will depend on how long your title is and what looks good.
9. Finally, place an orange circular rub-on from Cloud 9 Sorbet Flowers Glitter Rub-Ons in the centre of your complete flower.
What do you think? Do you like this scrapbooking idea? Do you have any questions? Would you have done anything different? We’d love to hear from you! Please leave a comment below.


obviously like your web site however you need
to check the spelling on several of your posts. A number of
them are rife with spelling problems and I to find it
very bothersome to inform the truth nevertheless I will definitely come back again.