
When I first saw Basic Grey’s Posh paper, I thought I should just frame it and put it on the wall. It’s so pretty I thought it would be a crime to actually cover any of it up. But I eventually made myself use it to create this layout. I chose a photo that would stand out on its own (you really can’t miss that bright blue water) so I could leave most of the paper on display without it taking all the attention. What do you think? Please let me know in the comments box at the bottom of this page.
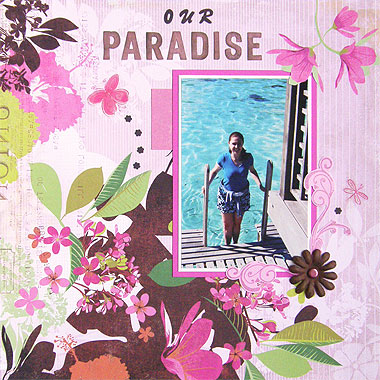
This layout was created using Basic Grey Sultry Posh paper from the Basic Grey Sultry Posh Paper Pack, two shades of pink Bazzill cardstock, pink cardstock, white cardstock, chocolate brown cardstock, Flourish stamps (mine are from Basic Grey), dark brown ink, pink ink, a pink pen, a chocolate brown flower, a pinkish brad, a small flower punch and NRN Butterflies and Flowers stickers.
To recreate this scrapbook page idea, follow these steps:
1. Use the Basic Grey Sultry Posh paper as your background but turn it on its side so the lines are vertical and the pink flower is in the top right corner.
2. Cut a piece of pink cardstock measuring approximately 4cm by 4.8cm. Glue vertically to your background approximately 12cm from the left edge and 7cm from the top edge.
3. Mat a 4×6 vertical photo with white cardstock and again with your darkest shade of pink Bazzill cardstock.
4. Position your photo on your page approximately 5.2cm from the right edge and 5.6cm from the top edge. Do NOT glue in place. Instead, take note of where your photo is positioned in relation to the pink flowers in the top right corner. Using a craft knife, cut around the edges of the flower your photo would cover just enough to allow you to slip your photo underneath. When you are happy with your cut, slide the top right corner of your photo into the slit and glue your photo in place.
5. Select a two word title for your layout. Cut the letters for the second word out of your lighter shade of pink Bazzill cardstock. Ink all over with dark brown ink. The resulting letters will be dark brown with a tinge of pink showing through. When dry, glue across the top of your page, leaving room to add another smaller word above it.
6. Cut the letters for the first word of your title out of chocolate brown cardstock. Glue them across your page, directly above the second word of your title.
7. Using pink ink, stamp two flourishes on your light pink Bazzill cardstock. If you don’t have stamps, you could draw the shapes yourself. Colour in with a pink pen (I have used glitter pink). Glue in the bottom right corner of your photo, as shown above.
8. Place a chocolate brown flower in the bottom right corner of your photo so it covers the join between your two flourishes. Attach with a pinkish brad.
9. Place a pink dragonfly (or butterfly) sticker to the right of your photo, as shown above.
10. Punch out a small flower from chocolate brown cardstock and glue in between your pink dragonfly and pink flourish, as shown above.
11. Place a pink butterfly sticker to the left of your photo and below your title, as shown above.
12. Punch out four small flowers from chocolate brown cardstock. Create a flight path for the butterfly and glue in place, as shown above.
What do you think? Do you like this scrapbooking idea with Basic Grey paper? Do you have any questions? Would you have done anything different? We’d love to hear from you! Please leave a comment below.


Hi Jen, Have just read your latest email and the gorgeous layout page you did from the Posh paper – I think it is just perfect. At present, I have about 1/4 of my stuff all laid out on my lounge ready to act on, but everytime I start I seem to have to pack it up again. I just love all your ideas and generally I print them out and put them in a display folder close to my favourite chair to enable me to quickly select one when I can. I am just now feeling like doing more crafty stuff so here’s hoping for the next few weeks. My husband keeps reminding me I should have started on my Christmas cards by now, so I am taking the hint. Keep up all those good ideas, and have fun with all your mum’s photos too. I am just starting on mine from our Townsville holiday last June, but I can go back about 50 years when I want to. Regards from Gladys
Thank you for the info, I have a 8 year old daughter whom wanted me to teach her scrap booking and this is the site I found. Thank you. ZW
Nice blog here! Also your website loads up very fast! What
host are you using? Can I get your affiliate link to your host?
I wish my web site loaded up as quickly as yours lol
I’ve been exploring for a little for any high-quality articles or blog
posts on this kind of space . Exploring in Yahoo
I at last stumbled upon this site. Studying this information So i’m glad to express that I’ve a very just
right uncanny feeling I found out just what I needed.
I such a lot definitely will make certain to do not overlook this
site and provides it a glance on a continuing basis.
A fascinating discussion is definitely worth comment.
There’s no doubt that that you should publish more about this topic, it may
not be a taboo matter but typically folks don’t discuss these subjects.
To the next! Kind regards!!
Thanks for sharing your thoughts about bernina embroidery machine supplies.
Regards
Thanks for finally writing about > Posh Basic Grey Paper < Liked it!