
My favourite layouts are those that show off a spectacular patterned paper while still drawing focus to the photos. So when I saw the new Sultry Basic Grey papers I knew I was going to have some fun! The background design of this layout was inspired by a layout by Azumi Izuno. What do you think? Please let me know in the comments box at the bottom of this page.
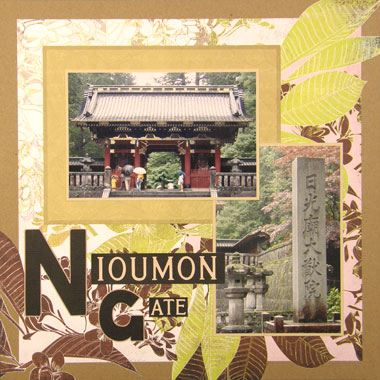
This layout was created using Basic Grey Sultry Swanky paper from the Basic Grey Sultry Swanky Paper Pack, brown cardstock, tan cardstock, textured chocolate brown cardstock, an American Traditional Designs Moments Frame (a goldish-brown patterned paper will do) and alphabet stickers.
To recreate this scrapbook page idea, follow these steps:
1. Use the brown cardstock as your background.
2. This step is a little tricky. You want to cut a square for the centre of your page. To do this, you want to remove 1.5cm from each side. However, don’t just cut straight lines all the way around. Instead, leave the large leaves in tact so that they extend beyond the edges of your square. Study the picture above to see what I mean before you start cutting your own square.
3. Glue your square to the centre of your page.
4. Glue your American Traditional Designs Moments frame in the top left corner of your page, approximately 3.5cm from the left edge and 3.6cm from the top edge. If you don’t have a frame, cut a piece of patterned paper in a similar colour that measures approximately 19cm by 14.3cm. Glue horizontally in the same position.
5. Mat a vertical 4×6 photo with tan cardstock. Glue in the bottom right corner of your page approximately 3cm from the right edge and 3.6cm from the bottom edge.
6. Mat a horizontal 4×6 photo with tan cardstock. Glue in the centre of your frame so that it overlaps the top left corner of your vertical photo.
7. Select a 2-word title for your page. Cut out the first letter of the first word from textured chocolate brown cardstock. It should be approximately 7cm tall. Mat with tan cardstock.
8. Cut a strip of textured chocolate brown cardstock measuring approximately 10.5cm by 2.5cm long. Using light coloured alphabet stickers, write the first word of your title, minus the first letter, across this strip. Glue to your layout approximately 7.3cm from the left edge of your page and 7.8cm from the bottom edge. It will slightly overlap your vertical photo.
9. Glue your large letter directly to the left of your first word, as shown above.
10. Cut out the first letter of the second word from your title from textured chocolate brown cardstock. It should be approximately 4cm tall. Mat with tan cardstock.
11. Cut a strip of textured chocolate brown cardstock measuring approximately 3.5cm by 1.5cm long. Using light coloured alphabet stickers, write the second word of your title, minus the first letter, across this strip. Glue to your layout approximately 12cm from the left edge of your page and 5cm from the bottom edge.
12. Glue your 4cm letter directly to the left of your second word, as shown above.
What do you think? Do you like this scrapbooking idea with Sultry Basic Grey paper? Do you have any questions? Would you have done anything different? We’d love to hear from you! Please leave a comment below.


Hello,
I love your site, thank you. Do you happen to sell the book, “500 Scrapbooking Sketches” ?
Kind regards
Proudly owning our story could be arduous but not practically as difficult as spending our lives operating from it.
Embracing our vulnerabilities is risky but not nearly as dangerous as giving
up on love and belonging and pleasure—the experiences that make us the
most vulnerable. Solely when we are courageous sufficient to..