
Newport Scenic Route Paper offers a richness of colour that brings your layouts to life. In this layout I have used three Scenic Route papers from the Newport collection, but you could easily re-create this design with any of your favourite papers.
Click Here To View Scenic Route Papers
It’s no secret that I am a fan of linear layouts (just look through the scrapbooking ideas here and you will soon notice a trend). I love the clean lines and balance achieved in linear designs. However, I also love the sophistication and elegance of scrolls and flourishes. This layout is intended to be an introduction to the use of scrolls on your scrapbooking pages. The design is still a strong linear onee but I have used two large scrolls to soften it and give it a sense of flow. If you want to try using scrolls on your layouts but aren’t sure what to do, this is a great idea to start with.
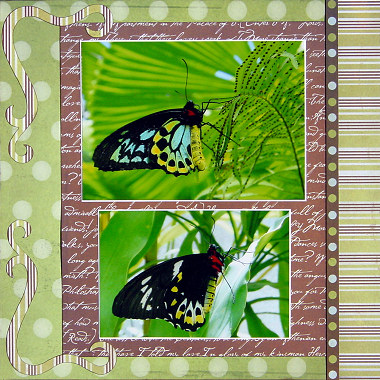
This layout was created using Scenic Route Newport White Script paper, Scenic Route Newport Jade Big Dots paper, Scenic Route Newport Chestnut Dots paper, white cardstock and dark brown ink.
Click Here To View Scenic Route Papers
To recreate this scrapbook page idea, follow these steps:
1. Use the Scenic Route Newport Jade Big Dots paper as your background. Ink around the edges with dark brown ink and set aside to dry.
2. Cut a strip from the underside of Newport White Script paper approximately 4.5cm wide. Make sure your stripes are horizontal. Ink the edges with dark brown ink. When dry, glue this piece of Scenic Route paper down the right side of your page.
3. Cut a piece of Newport White Script paper measuring approximately 22cm by 26.5cm, making sure the script is horizontal. Ink the edges with dark brown ink. When dry, adhere it to your background approximately 2cm from the top and up against your striped paper from the previous step.
4. Cut a thin strip of Newport Jade Big Dots Paper. Make it the width of one row of dots. Adhere down your page so that it covers where your striped paper meets your script paper.
5. Thinly mat your horizontal photos with white cardstock and arrange on top of the script paper as shown above.
6. Now it’s time to create your scrolls. You can use pre-made scrolls or use a template to cut out your own. Or, if you would like to dabble in a little doodling, you can draw your own. I drew my own using the underside of the Newport White Script paper. Once I had drawn the first one, I cut it out, flipped it over and used it as the template for the other.
7. Ink the edges of both scrolls with dark brown ink and when dry, glue one in the top left corner and the other in the bottom left corner, as shown in the scrapbooking layout above.
What do you think? Do you like this scrapbooking idea using Scenic Route paper? Do you have any questions? Would you have done anything different? We’d love to hear from you! Please leave a comment below.


