
Stamping is one of my favourite methods for creating completely unique and interesting backgrounds for my scrapbooking layouts. In this layout, I have taken a plain piece of blue cardstock and turned it into a beach design. All it took was a stamp and two shade of brown ink. It’s a very effective technique that anyone can do. My husband even asked me where I got the cool paper!
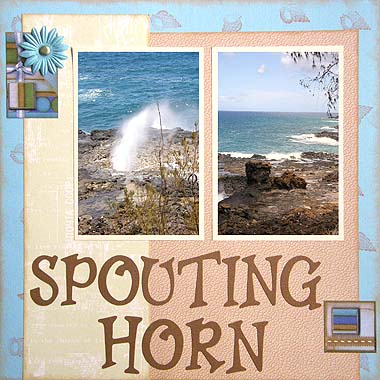
This layout was created using blue Bazzill cardstock, Hot Off The Press Tan Mosaic paper, Creative Imaginations Art Warehouse paper, brown Bazzill cardstock, cream cardstock, brown ink, light brown ink, a blue flower, a large metallic green brad, a shell stamp and All My Memories Carefree stickers.
To recreate this scrapbook page idea, follow these steps:
1. Use the blue Bazzill cardstock as your background. To jazz it up, use brown ink and a shell stamp (or other relevant stamp) to stamp images randomly around the cardstock. Don’t worry about covering the middle too much as it will be covered up later. Also, use your light brown ink to ink the edges, creating a sandy effect. Set aside to dry.
2. Cut a piece of Hot Off The Press Tan Mosaic paper measuring approximately 18cm by 28cm. Ink the edge with light brown ink. When dry, adhere vertically to the background along the bottom edge and approximately 1.8cm from the right edge.
3. Cut a piece of Creative Imaginations Art Warehouse paper measuring approximately 10cm by 29.3cm. Ink the edge with light brown ink. When dry, adhere vertically to the background along the bottom edge and approximately 1.8cm from the left edge.
4. Mat two vertical 4×6 photos with cream cardstock. Adhere the first approximately 3.8cm from the top edge and 6cm from the left edge. Adhere the second photo next to the first, approximately 3.8cm from the top edge and 3cm from the right edge.
5. Select a square sticker from All My Memories Carefree stickers. Place it towards the bottom right corner of your page, approximately 0.4cm from the right edge and 2.3cm from the bottom edge.
6. Cut out your title from brown Bazzill cardstock. Glue underneath your photos, as shown in the layout above.
7. Select a rectangular sticker from All My Memories Carefree stickers. I advise using the one with no writing, unless you don’t mind the writing being sideways. Place it vertically towards the top left corner of your page, approximately 0.6cm from the left edge and 2.6cm from the top edge. Make sure the flower on the sticker is in the top right corner.
8. Finally, embellish your rectangular sticker by using a metallic green brad to attach a blue flower on top of the flower pictured on the sticker.
What do you think? Do you like this stamping scrapbooking idea? Do you have any questions? Would you have done anything different? We’d love to hear from you! Please leave a comment below.


I love this layout, what a great idea using stamps to jazz up plain cardstock. A useful way also to stamp leftover scraps to add to layouts.
Keep up the good work
Maree
My brother suggested I might like this blog. He was totally right.
This post truly made my day. You cann’t imagine simply how much time I had spent
for this information! Thanks!
It’s remarkable in support of me to have a website, which is helpful designed for my
know-how. thanks admin
Do you mind if I quote a few of your posts as long as I
provide credit and sources back to your site? My blog is in the exact same niche as
yours and my users would really benefit from a
lot of the information you provide here. Please let me
know if this okay with you. Appreciate it!