
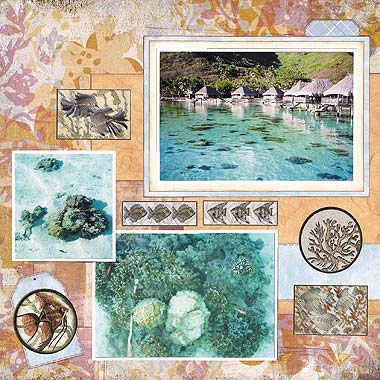
Some scrapbooking ideas are easier to come up with than others. On this layout I wanted to challenge myself and show off these gorgeous photos from our honeymoon in Tahiti. But how do you create a stunning page without taking attention away from photos of paradise?
I chose an orange and brown colour scheme. I know these aren’t usually the first colours that come to mind when planning a page for predominantly blue photos. However, these colours compliment the blue really well and make it pop from the page (afterall, what represents the water better than sandy colours next to ocean blue?). The Stamping Station stickers were also perfect for the theme and my choice of colours.
Click Here To View Our Range Of Beach Stickers
This layout was created using Basic Grey Deidre Perhaps paper, It Takes Two Orange Fibre paper, Creative Imaginations Oak Squares paper, Creative Imaginations Sunlight Linen paper, Creative Imaginations Hydrangea Wash paper, KI Expecting Chic Plaid paper, white cardstock, light brown ink, dark brown ink, a brown pen and Stamping Station Ocean Global Chic stickers.
To recreate this scrapbook page idea, follow these steps:
1. Use the Basic Grey Deidre Perhaps paper as your background. Lightly ink the edges with dark brown ink. Set aside to dry.
2. Cut a piece of It Takes Two Orange Fibre paper measuring approximately 23cm by 19cm. Generously ink the edges with light brown ink and then lightly ink the edges with dark brown ink. When dry, glue horizontally to your page along the right edge and approximately 5.5cm from the bottom edge.
3. Cut a piece of Creative Imaginations Oak Squares paper measuring approximately 12cm by 11.5cm. Ink the edges with dark brown ink. When dry, glue to your page approximately 3cm from the left edge and 4.5cm from the bottom edge.
4. Mat your main photo with white cardstock. Mat again with Creative Imaginations Sunlight Linen paper. Generously ink the edges with light brown ink and then lightly ink the edges with dark brown ink. When dry, mat again with Creative Imaginations Hydrangea Wash paper. And again, generously ink the edges with light brown ink and then lightly ink the edges with dark brown ink. Set aside to dry.
5. Cut a piece of KI Expecting Chic Plaid paper measuring approximately 4.5cm by 1.5cm. Cut off the top two corners, as shown above, to create a tab shape. Ink the edges with dark brown ink. When dry, use a brown pen to draw a stitch-like border around your tab.
6. Position your main photo towards the top right corner of your page, approximately 1cm from the right edge and 3cm from the top edge. Before it is fully glued down, slide your tab partly underneath the right side of the top edge, as shown in the layout above.
7. If you wish, add a comment or date to you’re your tab using your brown pen.
8. Cut a piece of Creative Imaginations Hydrangea Wash paper measuring approximately 10cm by 4.5cm. Generously ink the edges with light brown ink and then lightly ink the edges with dark brown ink. Using a brown pen, draw a dashed line close to the top and bottom edges to give a stitched appearance. Glue horizontally to your page so that it is up against the right edge and approximately 6.5cm from the bottom edge (it will be on top of your orange paper).
9. Mat your remaining two photos with white cardstock. Glue the larger of the two approximately 7.5cm from the left edge and 1.8cm from the bottom edge. Glue your second, smaller photo approximately 1.3cm from the left edge and 9.5cm from the bottom edge. It will overlap with the previous photo.
10. Cut a tag measuring approximately 4.5cm by 7cm from Creative Imaginations Hydrangea Wash paper. Generously ink the edges with light brown ink and then lightly ink the edges with dark brown ink. Using a brown pen, draw a dashed line border to give a stitch effect. Glue at an angle in the bottom left corner of your page. If you like, you can use a brad to attach it (I have simply drawn a small circle near the top of the tag).
11. Place a circular fish sticker in the middle of your tag.
12. Select the rest of the stickers you would like to use and place them around your page, as shown in the layout above.
Click Here To View Our Range Of Beach Stickers
What do you think? Do you like this beach scrapbooking idea? Do you have any questions? Would you have done anything different? We’d love to hear from you! Please leave a comment below.


Hi Jen
Love the page, the background colours are stunning, great pics to.
More important have a great 30th and I know you are going to be spoilt……spill the beans after ok.
Hugs
Hi Jen,
Loved your page the colours were great layout also great.
I will be thinking of you on the 19th as my Husband and I will be flying out of Melbourne to Turkey,going to attend Dawn Service at Galliopi. Have A fantastic Birthday.Will be ordering lots when we come Back.
Thanks Caryl & Laraine,
I’m so glad you like this page. I had a lot of fun with this one. Thank you also for the kind birthday wishes. I promise to spill all the beans soon. I hope you are having a wonderful time in Turkey Laraine! I’d love to hear about it when you get back.
Take care,
Jen
Link exchange is nothing else but it is just placing the other person’s
blog link on your page at suitable place and other person will also do same in favor of you.
If you want to increase your know-how only keep visiting this website and
be updated with the most recent news posted here.
Great blog you have got here.. It’s difficult
to find quality writing like yours these days.
I truly appreciate people like you! Take care!!