Scrapbooking Stickers

Christmas Scrapbooking Tags

Posted on August 4, 2008 by Jennifer Gormly

Tags: , , , ,

Christmas Scrapbooking Tags

Scrapbooking tags are great for embellishing a layout and easy to make with Christmas stickers. When using tags, I tend to place them a little haphazardly on a page to create a collage-like feel. However, this layout shows they can be just as effective in a balanced stream-lined layout.

Click Here To View Our Complete Range of Christmas Stickers

Christmas Scrapbooking Tags

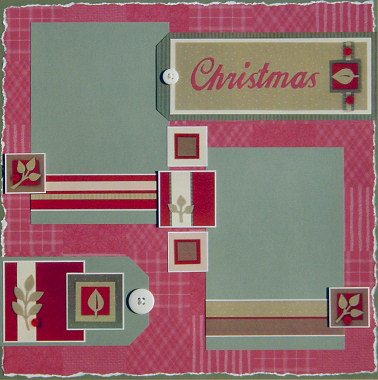
This layout was created using two shades of green cardstock, Patchwork Cranberry Patchwork paper, Patchwork Cranberry paper, white cardstock, white buttons, foam tape and Pebbles Inc Family Ties stickers.

To recreate this scrapbook page idea, follow these steps:

1. Use the darker shade of green cardstock as your background.

2. Tear all the way around the edges of your Patchwork Cranberry Patchwork paper so you end up with torn white edges. Adhere to the centre of your background.

3. Cut two photo mats from your lighter shade of green cardstock. The size should be slightly bigger than the size of your photos. Do NOT glue your photo to them yet. Instead, mat two sticker strips with white cardstock and then adhere across the bottom of each photo mat, as shown in the layout above. You will need to trim them to size. Now you can glue your photos in the centre of each photo mat and glue them to your background, as shown above.

4. Adhere the large tag sticker towards the top right corner of your page so that it is up against the right edge. Allow it to slightly overlap your photo.

5. Cut your title out from Patchwork Cranberry paper and adhere to the centre of your large tag. Complete your tag by placing a small white button at the top, as shown above.

6. Cut out a second tag from your light green cardstock. It should measure approximately 12cm by 7cm. Glue towards the bottom left corner of your page so that it is up against the left edge.

7. Mat the large red square sticker with white cardstock and adhere to the left side of your tag. Mat the green leaf square sticker with white cardstock and adhere towards the right end of your tag so that it still leaves some green space on your tag and overlaps the first sticker (see above for exact placement). Finish off your tag by placing a white button at the top, as shown above.

8. Mat the remaining square stickers with white cardstock. Position around your page, as shown on the layout above. Adhere the two square stickers with regular adhesive. But, use foam tape for the three stickers featuring leaves. This will add dimension to your page.

Click Here To View Our Complete Range of Christmas Stickers

What do you think? Do you like this scrapbooking tags idea? Do you have any questions? Would you have done anything different? We’d love to hear from you! Please leave a comment below.

Click Here For More Scrapbooking Ideas

Related Posts:

This entry was posted on Monday, August 4th, 2008 at 12:09 pm and is filed under Christmas, Tag Art. You can follow any responses to this entry through the RSS 2.0 feed. You can leave a response, or trackback from your own site.

Comments

Leave a Reply


Card Making Ideas eBook
Subscribe for your free email newsletter full of great scrapbooking ideas and your FREE Birthday Card Making Ideas eBook.

Enter your details below:

First name:

E-mail:

 
More Info
Scrapbooking Sketches
Card Making Sketches
Quotes
Sketches
Book Of Me
Old Scrapbooking Ideas

The Basics
Beginners Guide
History
Colour Wheel
Glossary

Techniques
Quick Layouts
  Lots of Photos
  The Wharf
  Crabs
  Country Bears
  Asian
Altered Items
  Travel Box
  Paint Tins
  Frames
  Clipboard
  Magnet
Backgrounds
  Beauty
  Buzz
  Long Walk
  Christmas
  Our House
Borders
  Sequences
  Nature
  Leaves
  Christmas Borders
  Stamp Borders
  Colour Blocking
  Kitty
  Rainforest
  Sir William Mog
  Playful
  Daisy
  Swimming
Card Making
  Easter
  Floral Cards
  Christmas Cards 1
  Christmas Cards 2
  Christmas Cards 3
  Tag Art
  Christmas Cards 4
  Birthday
  Floral
  Happy Birthday
  Presents
  Pirates
  Ice-cream
  Christmas Cards 5
Chalking
Chipboard
Circles
  New Friends
  Ikebukuro
  Stitch
  Santa
  Angels
  Disney Cruise
  Beauty
  Toontown
Collages
  Friendship
  Design Team 2
  Heritage
  Inking
  Inking 2
  Distressing
  Brothers
  Sanbutsudo
Colour Blocking
  Chatterbox
  Dreams on Parade
Diamond Folding
Doodling
Fancy Frames
  Suzy's Zoo
  Land of Nod
  Hoppy Easter
  Daydreamer
  Sundae
  Wedding
  Futarasan
Flowers
  Template
  Journey
Glitter
Inking
  Australia
  More Inking
  Dimension
  Water
  Raspberries
  Rinnoji
Journaling
  Creative Titles
  Hidden Journalling
  Mini Envelopes
  Creative Titles 2
  Without Photos
  Creative Titles 3
  Destination
  Journaling Hearts
Matting
  Lilo & Stitch
  4th Birthday
Mini Albums
  Floral
  Little Book
  Squash Book
  Baby Boy
  Baby Girl
  About You
  Sunbursts
  Christmas
Microscope Slides
Mulberry Paper
Paper Tearing
  Koalas
  Christmas
  Dimension 1
  Dimension 2
  Sky Rail
  Toontown
  Christmas
  Monuments
  Shiba Park
Patterned Papers
  Combining Papers
  Choosing Papers
  Co-ordinating
  Paper Collections
  Paper Collections 2
  Matching
  Layering 1
  Layering 2
  Embellish 1
  Embellish 2
  Embellish 3
  Simply You
  Boys
  Cairns
  Locals
  Ashleigh
  So Happy Together
  Love
  B'day Flowers
  Turns 3
  Fishing w/ Dad
  Too Cute
  Turns 13
  Asakusa
  My First Day
  Curious Cat
  Disney
Rub-ons
Scrapbooking Sketches
  Sketches 1
  Sketches 2
  Paisley
  Petals
  Fatherhood
  Beach Babes
  Sketches 7
Serendipity Squares
  The Basics
  Baby Girl
Sewing
  At the Park
  Sunshine
Shaker Boxes
Scrapbooking Stickers
Tags
  The Basics
  Tag Border
  Suzy's Zoo Tags
  Cat with Kittens
  Journaling Tags
  Design Team 4
  Stickers & Tags