
Today I wanted to share with you one of my free card making ideas that I sent to my Card Making Classroom subscribers. What is Card Making Classroom? It’s a free newsletter that I send every week through email featuring card making classes like this one. There is no charge and everyone is welcome. If you would like to join, please visit:
http://cardmakingclassroom.com/freeclasses/
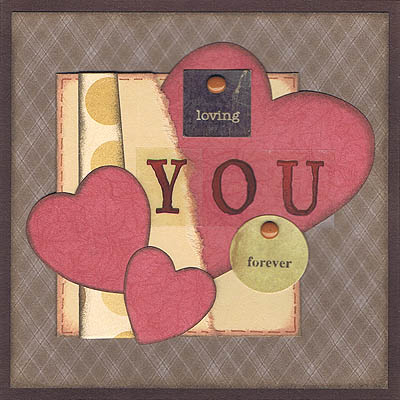
This particular card making idea was sent for Valentine’s Day but would work very well for a number of different occasions like anniversaries.
Items Required:
Dark brown cardstock, Patchwork Dark Brown Argyle paper (or any dark brown patterned paper), light brown cardstock, Doodlebug Brown Dots paper (or any light brown patterned paper), Red cardstock (or patterned paper), a brown pen, dark brown ink, light brown ink, two brown brads, a Pebbles Inc Loving sticker (if you do not have this, simply cut out a square of cardstock and write ‘loving’ on it), a Pebbles Inc Forever sticker (if you do not have this, simply cut out a circle of cardstock and write ‘forever’ on it) and brown alphabet stickers to write ‘YOU’ (mine are from Sandylion).
Instructions:
To create this card:
1. Cut a piece of dark brown cardstock measuring 4 inches by 8 inches (10.2cm by 20.4cm). Fold in half to create a card.
2. Cut a piece of Patchwork Dark Brown Argyle paper (or any dark brown patterned paper) measuring 3 3/4 inches by 3 3/4 inches (9.5cm by 9.5cm). Using a dark brown ink, ink all the way around the edges. When dry, glue to the centre of your card.
3. Cut a piece of light brown cardstock measuring 2 3/8 inches by 2 5/8 inches (6cm by 6.6cm). Using light brown ink, ink all the way around the edges. Then, very lightly ink the edges again with dark brown ink. Make sure you can still see plenty of your light brown ink. When dry, use a brown pen to draw a dashed border all the way around the edges, as shown above. Glue to your card approximately 5/8 inches (1.6cm) from the left edge and 5/8 inches (1.6cm) from the bottom edge.
4. Cut out a heart shape from red cardstock or patterned paper. It should be about 2 1/4 inches (5.6cm) across and about 2 3/8 inches (6cm) tall. Using dark brown ink, ink all the way around the edges. When dry, glue towards the top right corner of your card. Make sure you place it at an angle and covering a significant amount of your light brown cardstock. As shown above, you will be creating a pocket-like effect. If you wish, don’t stick it down until you have the next piece ready and can see exactly where you should position it.
5. Cut a piece of light brown cardstock measuring 1 1/2 inches by 2 5/8 inches (3.8cm by 6.6cm). Tear at an angle down the right side. Using light brown ink, ink all the way around the edges. Then, very lightly ink all the edges except the torn edge again with dark brown ink. When dry, use a brown pen to draw a dashed border around all the edges except the torn edge.
6. Glue the piece from the previous step to the left side of your light brown cardstock from Step #3. Make sure all the edges are inline. You have now created a pocket and your red heart from Step #4 should look like it is tucked into the pocket.
7. Cut a strip of Doodlebug Brown Dots paper (or any light brown patterned paper) 2 5/8 inches (6.6cm) long. Keep the left edge straight but angle the right edge so that your strip is 3/8 inches (1cm) wide at the top and 5/8 inches (1.6cm) wide at the bottom. Using dark brown ink, ink the long edges. When dry, glue vertically to your light brown cardstock approximately 1/4 inches (0.6cm) from the left side of your light brown cardstock.
8. You have now finished the basic elements of your card and just need to decorate it. Place your Pebbles Inc Loving sticker towards the top of your heart, as shown above. Again, if you do not have a sticker like this, cut out a square measuring approximately 5/8 inches by 5/8 inches (1.6cm by 1.6cm) and write ‘loving’ towards the bottom of it.
9. Place a brad at the top of your ‘loving’ square from the previous step.
10. Using brown alphabet stickers, write the word ‘YOU’ across your heart, underneath your ‘loving’ square.
11. Place your Pebbles Inc Forever sticker towards the bottom right of your heart, as shown above. Again, if you do not have a sticker like this, cut out a circle approximately 3/4 inches (2cm) across and write ‘forever’ towards the bottom of it.
12. Place a brad at the top of your ‘forever’ square from the previous step.
13. Finally, cut out two more hearts from red cardstock or patterned paper. One should be about 1 1/4 inches (3.2cm) tall and the other about 1 inch (2.5cm) tall. Using dark brown ink, ink all the way around the edges. When dry, glue in the bottom left corner of your light brown cardstock, as shown above.
Did you like this free card making idea? If so, please join us at Card Making Classroom for more free ideas every week.


i tried this just then and it looks FANTASTIC! My bf would love it as our 6th month aniversary! thnx
thnx
I got this website from my friend who informed me regarding this
web site and at the moment this time I am browsing this web site and reading very informative posts here.
best fish finder…
Free Card Making Ideas…
It’s going to be finish of mine day, except before end I am reading
this great piece of writing to improve my knowledge.
Admiring the time and energy you put into your blog and in depth information you offer.
It’s awesome to come across a blog every once in a while
that isn’t the same old rehashed material. Great read!
I’ve bookmarked your site and I’m including your RSS feeds to my Google account.
It’s really a great and usdful piece of information. I am glad that yyou
simply shared this useful info with us. Please keep us
informed like this. Thanks for sharing.