
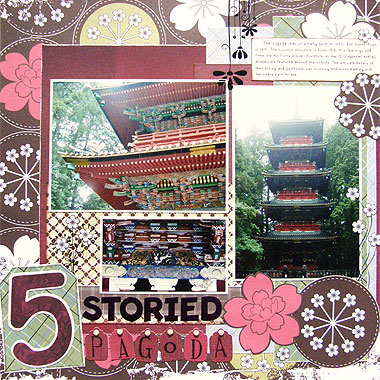
Scrapbooking rub-ons are perfect for that final special touch on your layouts. They give you the ability to add a sense of fluidity to your page by their ability to cross layers seamlessly. Of course, the fact that many of them are swirls and twirls also helps. The biggest problem comes when the brilliant colours of your background papers just swallow them up so you can hardly see the designs. This is precisely what happened with this page. I could have just not used them, but instead I decided to embellish my rub-ons so they would stand out. What do you think?
This layout was created using Urban Lily Sushi Dot paper, Daisy D’s Barn School Book Check paper, KI Expecting Chic Plaid paper, KI My Guy Chick Plaid paper, Karen Foster Red Christmas Stripes Paper, Basic Grey Urban Couture Loselle Paper, Patchwork Chocolate Brown Plaid paper, Hot Off The Press Red Fabric paper, cream cardstock, a black pen, brown ink, brown alphabet stickers, cream brads, Bo Bunny Barn Red Linen Alphabet Tags stickers and Bo Bunny Greenhouse Rub-Ons.
To recreate this scrapbook page idea, follow these steps:
1. Use Urban Lily Sushi Dot paper as your background.
2. Cut a piece of Daisy D’s Barn School Book Check paper measuring approximately 27cm by 22.8cm. Run the edge of your scissors or sandpaper along the top, bottom and left edges to give a white edge. This will help it stand out from the background.
3. Place your Barn paper horizontally on your background so that it is up against the right edge of your page and approximately 3.8cm from the bottom edge. Do NOT glue in place. Instead, take note of the area of Sushi Dot paper you are covering. From within that area, cut out one blue flower circle, one red flower, one white flower, one blue flower circle (without the outer circles) and at least nine small blue circles. Make sure you leave a brown border around each one as you cut them out.
PLEASE NOTE: If you don’t want to cute out the small blue flowers, you could always use a punch to create similar shapes with blue cardstock.
4. Put the flowers aside and glue your Barn paper in place (up against the right edge of your page and 3.8cm from the bottom).
5. Cut a piece of KI Expecting Chic Plaid paper measuring approximately 13.5cm by 25.8cm. Run the edge of your scissors or sandpaper along the top, bottom and left edges to give a white edge. Glue to your background vertically about 0.5cm from the right edge and 2.2cm from the bottom edge.
6. Cut a piece of Karen Foster Red Christmas Stripes Paper measuring approximately 7.5cm by 10cm. Ink the edges with brown ink and when dry, glue vertically to your background about 5.5cm from the top edge and about 7.5cm from the right edge.
7. Cut a piece of Basic Grey Urban Couture Loselle Paper measuring approximately 19cm by 11cm. Ink the edges with brown ink and when dry, glue horizontally to your background about 4.5cm from the bottom edge and 4cm from the left edge.
8. Cut a piece of Patchwork Chocolate Brown Plaid paper measuring approximately 19cm by 2.2cm. Run the edge of your scissors or sandpaper along the top, bottom and left edges to give a white edge. Glue horizontally to your background about 5.3cm from the bottom edge and 4cm from the left edge.
9. Cut a piece of KI My Guy Chic Plaid paper measuring approximately 7.5cm by 27.3cm. Run the edge of your scissors or sandpaper along the top, bottom and left edges to give a white edge. Glue to your background vertically about 1.2cm from the right edge and 1.5cm from the bottom edge.
10. Mat three photos with cream cardstock.
11. Glue your vertical photo to your page approximately 1.7cm from the right edge and 8cm from the bottom edge.
12. Glue your large horizontal photo to your page approximately 4.2cm from the left edge and 6.6cm from the top edge.
13. Glue your small horizontal photo to your page approximately 8.1cm from the left edge and 6.9cm from the bottom edge. Your measurements may vary a little. Aim for the right edge of both horizontal photos to be inline with each other.
14. Glue your large white flower at an angle in the top right corner of your page, as shown in the layout above.
15. Cut a piece of cream cardstock measuring approximately 10.5cm by 3.5cm. Using a black pen, add your journaling to the centre. Ink the edges with brown cardstock and when dry, glue in the top right corner of your page so that it is up against the right edge and approximately 3.2cm from the top edge.
16. Embellish your journaling by adding a small blue flower above it, as shown in the layout above. Also, place a large blue flower below it so that it overlaps with your journaling block and the photo below. Trim away any excess overhanging the page.
17. Now it’s time to add your Bo Bunny Greenhouse Rub-Ons. First, add the hanging down flowers. Position them next to your journaling block. The large flower should slightly overlap with your photos. Second, add the swirls and leaves rub-onto to the bottom right corner of your vertical photo. Finally, add the flower bursts rub-on in the space next to your small horizontal photo. See the layout above for precise positioning.
18. Cut a tag measuring approximately 6.3cm by 8.2cm from KI My Guy Chick Plaid paper. Run the edge of your scissors or sandpaper along the top, bottom and left edges to give a white edge. Draw a thin black border around the inside of the tag with a black pen. Glue at an angle in the bottom left corner of your page.
19. Cut a large letter (or in my case, number) from the Hot Off The Press Red Fabric paper (any deep red paper will do). This will be the first letter/number of your title. Mat with cream cardstock and glue to the centre of your tag.
20. Place brown alphabet stickers directly below your small horizontal photo to complete the first word of your title.
21. Place Bo Bunny Barn Red Linen Alphabet Tags stickers directly below your first word to complete the second word of your title. Put a cream brad through the top of each tag sticker.
22. Place your large blue flower circle in the bottom left corner so that it overlaps slightly with your vertical photo and rub-on. Position your large red flower next to it, and a small blue flower in the remaining space.
23. Finally, add small blue flowers to embellish both the flower burst rub-on and the swirls and leaves rub-on, as shown in the scrapbooking layout above.
What do you think? Do you like this scrapbooking idea? Do you have any questions? Would you have done anything different? We’d love to hear from you! Please leave a comment below.


Hi I loved your page but evey time l use rubs on they only half come out, what is your secret, and what am l doing wrong.
Help Sue
I found the page to busy for me. Sue
it is a little confusing. but u will see how it goes to gether at the end. it takes a while to do. DON’T HAVE LITTLE KIDS WHILE U R DOING THIS!!!!!!!!
[...] Five Storied Pagoda with Bo Bunny Rub-Ons http://www.stickersnfun.com/embellishing-scrapbooking-rub-ons/ [...]